Easy-Peasy Sugar Cookies (Base Recipe)

These cookies make a great base for decorating. If you go with the chilled dough method, you can use cookie cutters to cut them into fun shapes, but unlike a lot of recipes, this dough can be baked immediately, without chilling first.

Freshly Baked Spring Flower Gourmet Cookies

Easy-Peasy Sugar Cookies

Optional: Add 1/2 tsp additional extract for flavor, like mint, almond, coconut, or lemon.

Optional: Use a few drops of food coloring to make brightly-colored cookies (separate into four parts with two drops color each and make rainbow cookies!)

Optional: use only vanilla extract in the dough and roll the cookie balls in a mixture of 2T sugar and 1tsp cinnamon before baking to make snicker-doodles.


Basic Sugar Cookie Glaze

  • 1 c powdered sugar
  • 3 T milk, almond milk, water, or juice
  • 1 tsp extract of choice
  • food coloring – optional

*If you are using gluten-free flour without any binding agents, you will need 1/2 tsp of xanthan gum or 1 tsp guar gum.

Instructions – Cookies

  1. Preheat oven to 375 degrees F (190 degrees C).
  2. In a small bowl, combine flour, baking soda, and baking powder. 
  3. In a large bowl, cream the butter and sugar. Beat in the egg and flavor extracts once the butter and sugar mix is smooth and fluffy.
  4. Blend in the dry ingredients a little at a time (in three parts).
  5. If you want to cut the cookies perfectly round, you can roll the dough into a cylinder shape, wrap in plastic, and refrigerate for an hour before slicing with a sharp knife. You can alternately use the dough right away if you don’t mind imperfect edges. Use a teaspoon and to make rounded scoops of dough, then roll them into balls and place them 2″ apart directly onto no-stick cookie sheets or silicon liners.
  6. Bake 8 to 10 minutes, or until golden around the edges.
  7. Leave on the cookie sheet two minutes before removing with a spatula to wire racks or a big plate where the cookies can stay flat until completely cool.

Instructions: Glaze

Mix everything together with a fork until all lumps are gone and mix is shiny. Glaze cookies only after they’re completely cool.

Bird Feeder

Bird Feeder

Aren’t birds amazing? They are in a class of their own. Like mammals, birds are warm blooded, but they lay eggs like cold-blooded reptiles. They are covered in feathers. Some fly in the air and some swim in the ocean, play games, use tools, sing songs, do complicated dances, decorate their homes, and some travel very long distances when the seasons change.  Birds are descended from a dinosaur called maniraptoran theropod, the same family as the Velociraptor; some scientists believe those dinos were covered in feathers, too. So when you’re watching a little bird hop around, it’s the closest you’ll get to seeing a real, live, miniature dinosaur!

All year round you can invite birds to dinner at your home with this easy bird feeder.

What you need: 

  • Wood glue or hot glue
  • Large craft sticks (between the size of a tongue depressor and a popsicle stick)
  • Yarn or hemp string
  • Peanut butter
  • Birdseed

Instructions

  1. Make the base of the bird feeder. Lay one stick out, and then line up more sticks side-by-side, perpendicular to stick #1 until you have enough to span the width of stick #1 (which will cover the whole bottom of the feeder.) Leaving the other sticks in place, aligned side-by-side, and with all the ends even to each other, put a line of glue across stick #1 and glue it along one edge, so it holds together all the ends of all the other sticks. Use another craft stick and more glue to do the same on the opposite side.
  2. Using the “log cabin” method, build up the sides of your feeder by gluing down two sticks to opposite sides of the square, and then repeating the process with the next two opposite sides, until your feeder is five or six layers of craft stick high.
  3. Cut four equal lengths of strong string, 24-36″ long. Tie one to each corner of the feeder.
  4. Put the feeder flat on the floor and hold all four strings together at the top. Lift the feeder slightly up and make sure it hangs in a balanced manner, adjusting the strings as needed. Now, tie off the strings in a knot about 10-12″ from the top. You will use the remaining top 12″ of string to tie the feeder to a tree branch. If you’re hanging it from a hook, you can tie the top into a loop.
  5. Spread peanut butter all over the bottom tray of the feeder and pour some birdseed on top. Hang your feeder where birds will find it (but far enough from the ground that cats and other predators can’t easily reach it) and wait. You will soon have finely feathered visitors!

More Fun Facts About Birds:

  • There are roughly 10000 species of birds on Earth.
  • The ostrich is the largest bird in the world. If you put a cheetah and an ostrich in a race, the cheetah could outrun the ostrich over a short distance, sprinting short distances at 59 miles per hour. But an ostrich can run very long distances at over 40 mph, and would eventually outdistance the cheetah.
  • Birds have lightweight, but strong, hollow bones that don’t weigh them down while they’re riding wind currents far overhead.
  • Some bird species of birds — like corvids, which include jays, ravens, and crows, are so intelligent that they can create and use tools, play games with each other, and play pranks on their foes!
  • Ostriches, emus, cassowaries, rheas, kiwi, and penguins cannot fly at all.
  • Hummingbirds are the smallest birds in the world, and some of them travel up to 3000 miles at a time miles in a migration season. They can fly backwards and hover, and can flap their wings up to 200 times per minute! The bee hummingbird is the smallest bird in the world at only 2″ long.

Make your own observations:

What birds are common where you live? If you put different types of seeds in your feeder, do different birds come to eat? Do you see different birds in the summer than you do in the winter? Can you find a bird-watching guide and name all the birds who visit your feeder?

Related YogaKids Poses:

Crane, Flamingo…what other yoga poses remind you of birds?

ASL Valentines Day Card

Animal Hand-tlersASL Valentine's Day Card Craft

Valentines Day falls on February 14 every year. The real history of Valentine’s Day is a little confusing. It began as two different pagan festivals that were later adopted by the Catholic Church as an entirely separate festival honoring two men (both named Valentine, who were executed on Feb. 14 in two different years, by a Roman emperor) who were later declared Saints. So while the story of Valentine’s Day has some dark and unclear origins, today we exclusively celebrate the holiday to spread love and fond wishes (and little candy hearts).

The people of Earth speak a multitude of languages. What languages do you speak? How do you say “I love you” in your native language? Do you know how to say “I love you” in any other languages?

Here is how we say “I love you” in some of the world’s most widely spoken languages. You can look up videos online for instructions on how to pronounce these words. Can you match the languages to the countries whose people speak them? Can you find those countries on a world map?

Chinese: Wǒ ài nǐ

Spanish: Te amo.

Arabic: ‘Ahabak

French: Je t’aime

Japanese: Watashi wa, anata o aishiteimasu

Hindi: Main tumase pyaar karata hoon

Russian: Ya lyublyu tebya

Portuguese: Eu te amo

Bengali: Āmi tōmāẏa bhālōbāsi

Javanese: Kangen


Today, we are going to make a Valentine’s Day card in ASL – which is short for American Sign Language. ASL is the beautiful language that people who are hearing impaired “speak” with their hands.

Materials & Instructions

  • Colored paper – one sheet in your flesh color and one in the color you want for the card’s background.
  • Glue
  • Markers, crayons, pens, etc.
  • Glitter or other decorations (optional)
  1. Trace your hand and a little bit of your wrist on a piece of paper the color of your skin.
  2. Cut it out.
  3. Fold the other colored piece of paper in half to make the card.
  4. Glue just the palm of the hand and the wrist section to the card, leaving the fingers loose.
  5. Now, place a tiny dot of glue on the tip of the pointer finger, pinkie, and thumb, and glue those fingers in place.
  6. Fold (don’t crease) the middle two fingers down to the palm of the hand and, using a small drop of glue on the very tip of each of those fingers, attach them in place to look like the picture.
  7. Now add your own message of love to the inside and outside of the card and give it to a person you love!

Happy Valentines Day!

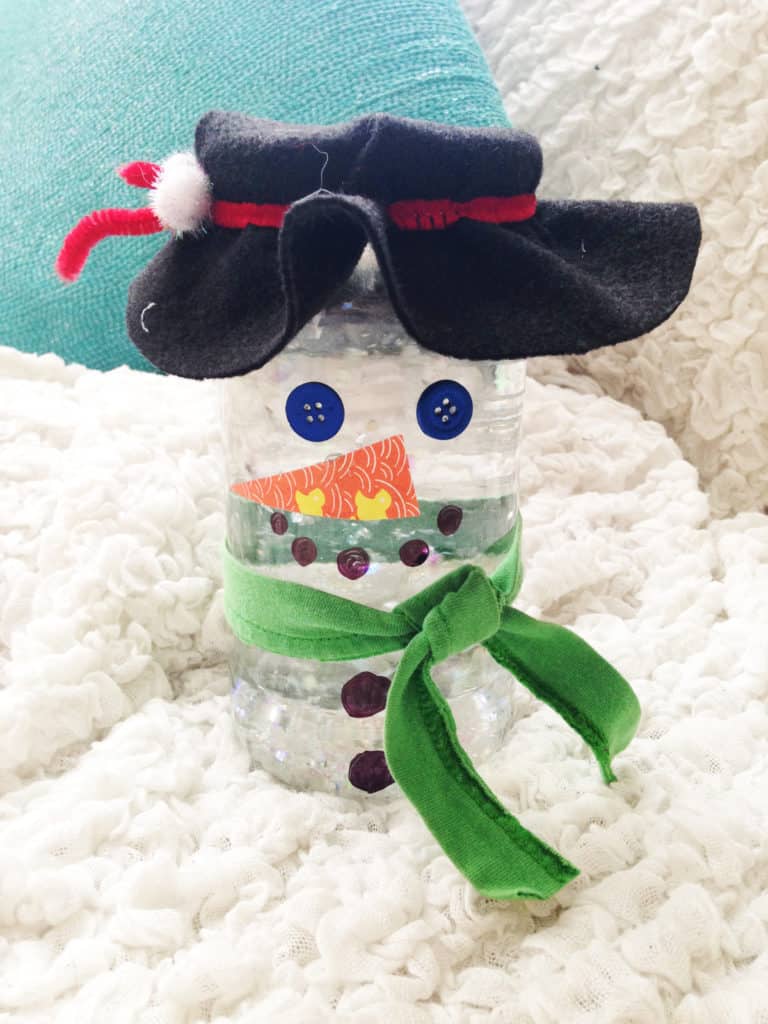
Snowman Glitter Shaker

Snowman Glitter ShakerSnowman Glitter Craft

Supplies

  • One jar with a screw on lid (like a pasta sauce jar)
  • One 12”x12” piece of felt for the hat
  • Hot glue
  • Glycerin
  • A ribbon or other piece of fabric for the scarf
  • A pipe cleaner for the hat
  • A small piece of orange paper, cut into a triangle, for the carrot nose
  • A black sharpie for eyes and buttons
  • Other decorations, like jingle bells and pom-poms for the hat, or buttons for the eyes, mouth
  • Water
  • Plastic glitter in large and small sizes.

Instructions:

You may adjust the glycerin-to-water ratio for the size of your jar – I am using a 24 oz. jar in the example.

  • Remove the label and scrape off any leftover glue. Make sure the jar is completely dry.
  • Begin by tying the scarf onto the jar and adding a dot of hot glue to the front and back, between the ribbon or fabric and jar, to hold the scarf in place.
  • Glue on button eyes or draw on black circles for eyes, mouth, and buttons. Glue on the nose.
  • Trace a circle onto the felt using a bowl, and cut it out. Note: Using the lid of your jar as a guide, you should have no less than 1” extra fabric all around. I have about 1.5” margins on mine.
  • The larger the circle, the floppier the hat.
  • Add ¼ cup of glycerin and about 1 cup water. Put the lid on the jar and shake until mixture is homogeneous.
  • Put a maximum of 2 Tablespoons of plastic glitter into the jar, then fill until about 1” from the top of the jar. Put the lid on and make sure you like the consistency of the water and glitter. If you want to add more glycerin to make the glitter move more slowly, add it now and mix well.
  • Once you’re happy with the water viscosity, fill the last remaining space up to the brim and put the lid on. Dry any water spots that may have leaked out, and hot glue around the base of the lid.
  • Center the circle of felt on the lid and hot glue it in place.
  • Crimp the felt as needed to get the shape of hat you want, and wrap the pipe cleaner tightly under the base of the lid, twisting the ends to hold it together. You will probably need more than one set of hands for this step! Add decorations, like pom-poms, silk flowers, or a bow) over the place where you twist the pipe cleaner closed.
  • Let it snow!

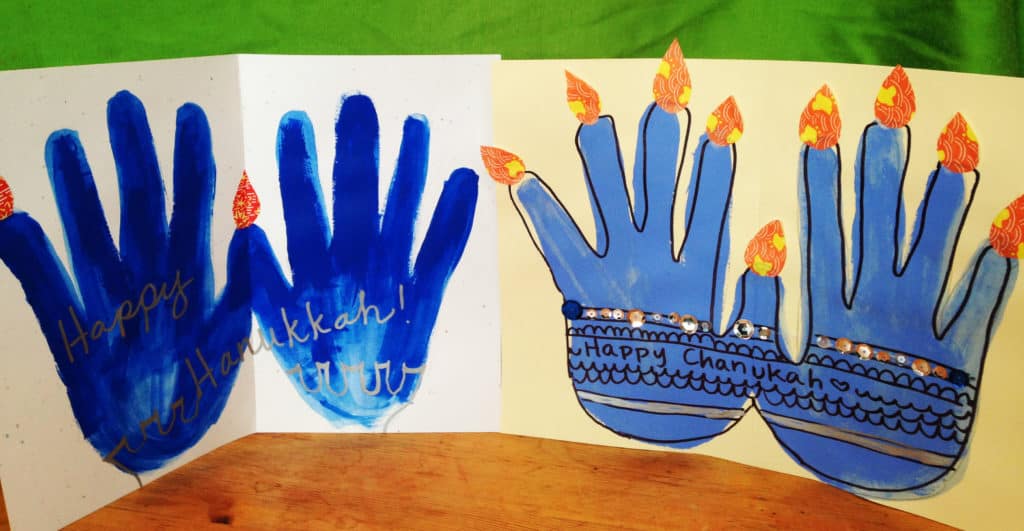
Handprint Menorah

Handprint MenorahHandprint Menorah

Supplies:

  • Patterned or brightly colored paper to use for candle flames
  • A piece of card stock
  • Tempera or other water based paint in the color you want your menorah
  • Scissors
  • Glue or glue stick
  • Metallic sharpies, paints, sequins, etc. optional – for decorating the menorah

Instructions:

  • Fold the card stock in half, and then unfold it. Lay it flat.
  • Placing your left hand on the left side of the paper, with your thumb straight up, across the center fold line.
  • Trace your hand, then repeat on the right side, with your thumb in the same place as the left thumb.
  • Paint inside the lines you just traced.
  • Allow paint to dry and then decorate over the top of the menorah.
  • Fold the piece of paper you’re using for flames in half. Draw five flame shapes and cut them out of the folded paper to make ten flames. (That’s one left over)
  • Glue a flame in the center, then “light” one finger of the menorah for each night of Chanukah.
  • Keep the extra flames in an envelope nearby so they don’t get lost, and enjoy the Festival of Lights!

Handy-bird Decoration

(Originally published in the 2016 YogaKids Holiday Family Fun Guide)

Supplies:

  • 1 wooden craft stick for each bird
  • Scissors
  • Brightly colored tempera paint (or other water based paint, watered down enough to make a hand print)
  • One sheet of any-colored colored card stock or construction paper
  • Paint, sharpie, or marker in a color that will show up on your paint
  • Whatever color paper you want to use for your bird’s beak
  • Glue
  • Googly eyes and other decorations, like pom-poms or glitter — optional

Instructions:

  • Brush a thick layer of paint onto a surface that’s flat enough to place your hand on, like a flat dinner plate or baking pan.
  • Place your hand, palm down, into the paint and roll it slightly to make sure the palm is covered
  • Press your hand onto a sheet of paper and lift it back up without moving it around on the paper
  • Let the paint dry before cutting around it.
  • Decorate your bird.
  • Glue one end of the popsicle stick to the back of your bird and draw little feet on the stick with a permanent marker or paint. Make sure the popsicle stick extends onto the paper by an inch or more to keep your bird from flopping over.
  • Stick your bird into a houseplant or holiday centerpiece for extra cheer!
  • Do you live in a very cold place? Maybe your bird needs a scarf or a warm hat. Use construction paper and other fun materials, and decorate to your heart’s content.

Animal Hand-tlers

(Originally published in the YogaKids 2016 Holiday Family Fun Guide)

Supplies:

  • Two pieces of card stock or construction paper per pair
  • Scissors
  • Writing utensil
  • Stapler and/or glue
  • Optional: coloring tools, paints, sequins, and other “flair” for decorating

Instructions:

  • Fold construction paper in half (short way) and trace hand on one half. Cut out both at the same time.
  • Fold other piece of construction paper in half, longways, and then each half in half. Cut along the lines. This will make one (with a left over paper strip) big head band or two small headbands.
  • Staple or glue the ends of the strips together to make them longer and measure the band around your head. If it’s not long enough, add a third strip to extend and cut to fit. Do not staple or glue them together to make the band yet.
  • The antlers will be laid out with the thumbs facing inward. Decorate or color them if you want to. Decorate or color the band if you want to.
  • Find the center of the band, and staple or glue the hand shapes to the inside, so the bottom of the palm is under the band.
  • Finally, close the band where it fits your head by stapling it together in the back, and then cutting off any parts that are too long.
  • Wear and make animal noises! What does a reindeer sound like? How about a moose?

Animal Hand-tlers

Animal Hand-tlersAnimal Handtlers Craft

Supplies:

  • Two pieces of card stock or construction paper per pair
  • Scissors
  • Writing utensil
  • Stapler and/or glue
  • Optional: coloring tools, paints, sequins, and other “flair” for decorating

Instructions:

  • Fold construction paper in half (short way) and trace hand on one half. Cut out both at the same time.
  • Fold other piece of construction paper in half, longways, and then each half in half. Cut along the lines. This will make one (with a left over paper strip) big head band or two small headbands.
  • Staple or glue the ends of the strips together to make them longer and measure the band around your head. If it’s not long enough, add a third strip to extend and cut to fit. Do not staple or glue them together to make the band yet.
  • The antlers will be laid out with the thumbs facing inward. Decorate or color them if you want to. Decorate or color the band if you want to.
  • Find the center of the band, and staple or glue the hand shapes to the inside, so the bottom of the palm is under the band.
  • Finally, close the band where it fits your head by stapling it together in the back, and then cutting off any parts that are too long.
  • Wear and make animal noises! What does a reindeer sound like? How about a moose?