Pedal Laughing

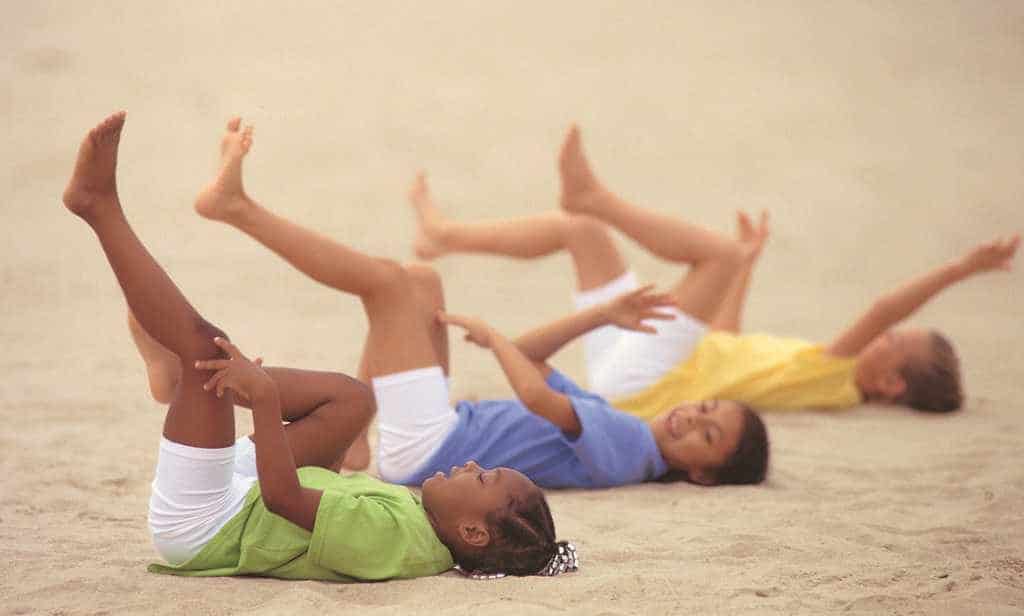
Pedal Laughing Pose

Laughter is an international language. Pedaling a bike is excellent exercise. Put these two together and travel to the land of ha ha he he health.

Instructions

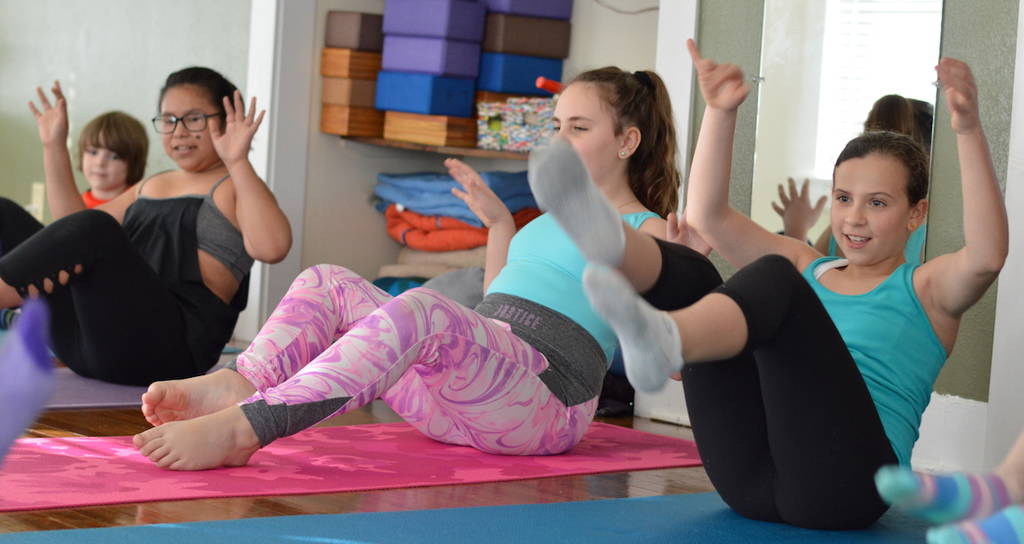
  1. Sit in a chair or lie on your back.
  2. Bend your arms and legs like you are riding bicycles in the air.
  3. Pedal forward: laugh.
  4. Pedal backward: laugh.

It might be hard to really laugh at first, but once you get started, you won’t be able to stop. Have fun and be silly with this pose!

Notes for Parents and Teachers

Laughing is a great way to lighten up an intense mood or situation. If tension is mounting and bad moods are escalating designate a laughing break. Remind yourself and your children to look at the lighter side of things.


Activity Ideas for Home or Classroom

Math Medley/Awesome Anatomy
Count out loud or use a timer to see how long each person can maintain their pedal laughing. Time pulses and heart rates too. Make a chart or graph to look at the comparisons.

Body Benefits
Laughter lowers blood pressure, reduces stress hormones, increases muscle flexion, boosts immune function and produces a natural body chemical called endorphins, which make you naturally feel good.

Musical Musings
Form a Pedal Laughing chorus or choir. High tone laughters are sopranos, low tone ones are bass. Medium low laughers are tenors and medium high are altos. Take turns being the conductors to bring in different voices, get louder or faster and to stop.

Nutrition Tip
Have fun with your food! Many of us have a “love-hate” relationship with food.  It is a necessary part of our daily lives but is often confusing, time consuming and takes us away from other activities we would rather be doing.  This week bring laughter into your life with the Pedal Pose and bring that laughter and feeling of play into the kitchen.

  • Have family members create their favorite meal – participate in the menu planning, preparation and cleaning.
  • Play music in the kitchen.
  • Keep fresh flowers in your eating area.
  • Practice cooking different types of foods – get the children involved in cooking new foods and new recipes.
  • Connect Food to cultures or countries your children may be studying in school.
  • Have family members select a vegetable or fruit of the week – something you have never tried – they find a recipe(s) and help with the preparation.
  • Try to sit down and eat as a family at least a couple of times a week – no TV, no phones, no computers.  Enjoy a fun relaxed meal together.

It’s All Fun and Games with Yoga

Children in a YogaKids Class

A great way to get kids moving and enjoying yoga is by turning the poses into a game. Gather up the kids and incorporate a yoga aspect to games that you already play. Check your game closet and re-sales for inspiration. Here are some games that I incorporate when I teach YogaKids classes or just want to play around with my own kids.

Yoga Parachute: Place pose cards (picture cards of kids performing yoga poses) under a kid’s toy parachute. Take turns running under and grabbing a card. You can even say a little rhyme to go with it.  As we all lift the parachute up and down we say “1,2,3,4… get down on the floor… 5,6,7,8 pick a pose that feels great!” The child whose turn it is goes under the parachute on “4” and tries to be out with a pose card by “8.” After everyone has a turn, create a flow with each child performing the pose on his or her card.

Yoga Jenga: Place small stickers on several of the jenga blocks. Make a key indicating to what pose each sticker corresponds. When the child pulls out a Jenga block from the tower, they will see what pose should be performed by all players. When the tower falls, have all the players hold a challenging pose for several breaths. I like to use Lizard pose!  

Yoga Limbo: Even a broomstick will work. Try Down Diggety Doggie Down and crab walking under the stick. Don’t forget to play Chubby Checker’s Limbo Rock song!

Dice Game: Use oversized dice. Roll the dice and add them together. (Multiply for older kids.) That’s how many seconds to hold a certain pose.

Suspend Game (by the brand Melissa & Doug): This is a fun game of balance. When you roll the dice, do a certain type of pose corresponding to a different color (green = backbend, yellow = balance, red= twist, blue= inversion, etc.) . The game includes a stand and several sticks that players will suspend and balance on each other. When it falls down, hold a challenging pose for several breaths.

Moo, Moo, Cat: Just like Duck, Duck ,Goose – but we substitute yoga poses, like Moo and Meow.

Puzzles: Before you play with the kids, assemble an easy kid’s puzzle face down. Write several poses on the blank side so that the words overlap on different pieces. Break apart the pieces and assemble again face down with your YogaKids. You can every try to do all the poses in a flow series.

Scrabble or Bananagrams: Use the tiles to create pose names that can be linked together. Can the poses be performed together to make a flow that feels fantastic? You can also arrange the tiles in a mixed up order to spell a pose. The kids can unscramble the letters and do the pose.

Boggle: Do you see any words that could be poses? Can you make up poses for any words you find?

Operation: Get your Awesome Anatomy! Players perform surgery and then do poses that could help that part of the body feel better.  Twisting helps our “spare ribs” feel good!

Peace – It’s like the card game “War” but We All Win because we are doing yoga! Take a stack of blank index cards and write a name of a pose on each card. Divide the cards among 2 players.  They each flip over their card at the same time.  They need to each perform the pose but try to link it together to make it a partner pose.  Imagine what a Downward Facing Dog Pigeon might look like!

Kids Choice Game: Challenge your students to turn a game that you already have into a yoga game

Be creative, stay active, giggle and have fun with the YogaKids in your life!


Create your own We All Win games as a Certified YogaKids Teacher!

Dromedary Delight

Dromedary Delight Pose

A camel has two humps, and a dromedary, a type of camel, has only one. Both store fat (not water) in their humps.


Instructions

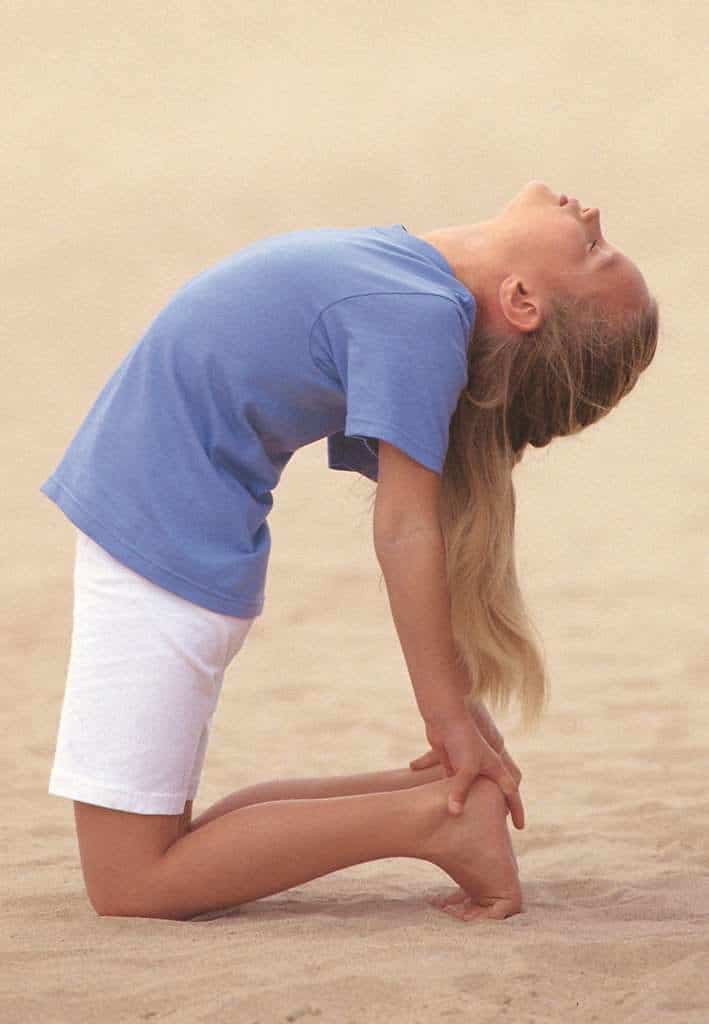
  1. Kneel on the floor with your legs and knees hip width apart.
  2. Press the tops of your feet into the floor, push the thighs forward, bring the hands to the lower back with fingers pointing upward and lift the chest.
  3. Breathe evenly in and out, as you extend the ribcage and broaden your chest.
  4. Continue to lift your chest with each breath as you curl your toes forward and bring your hands to the heels to imitate the camel’s hump. The head can come back (as shown) or tuck into the chest.
  5. Delight in the dromedary for ten seconds.
  6. Rest in the child’s pose after each of these backbends.
  7. Repeat.

Increase the times and repetitions as your spine and chest continue to become more flexible.

Note to Parents and Teachers

This pose strengthens the back and kidneys. Because of its chest opening ability, it can increase lung capacity and can be especially beneficial for children with asthma. It also helps the posture of those with drooping shoulders and rounded backs.


Activity Ideas for Home and Classroom

Ecological Echoes
Camels and dromedaries avoid trotting and galloping whenever possible in order to save water and energy. They can survive for months without water and can drink up to 35 gallons of water at a time.

Awesome Anatomy
Lift your chest, by letting the arch of your spine and your back ribs support you. Imagine your back ribs as lounge chairs for your lungs. Let your lungs expand and rest on these slatted chairs. Feel how much your lungs can expand when you breathe fully.

The lungs are light and spongy and are filled with millions of air channels which provide an enormous surface to absorb oxygen. If your lungs were flattened out, they’d make a slippery surface the size of a tennis court!*

* The Children’s Atlas of the Human Body by Richard Walker, The Millbrook Press Inc., 1994, Pg. 24


African Rain Sticks

Water is so important in our lives. Think about how much you use in a day and most importantly: how lucky you are to have — what feels like — unlimited access to clean water.  The Water Princess is a great book to help us all understand what life is like for those of us less fortunate when it comes to water supply. Pick up the book at your local library — and make your very own African Rain Stick!


AFRICAN RAIN STICK

Materials:

  • cardboard tubes
  • construction paper
  • aluminum foil
  • rice, beans, or popcorn seeds
  • beads, feathers, markers and other decorating supplies

Instructions:

  1. Cover one end of the cardboard tube with a piece of construction paper. Make sure the end is completely covered and either tape or glue it shut.
  2. Cut aluminum foil into long strips. Crumble the strips up and place them into the tube.
  3. Pour a cup of rice, beans or popcorn seeds into the tube.
  4. Cover the 2nd end of the tube with construction paper. Make sure the entire end is completely covered and glue or tape it shut.
  5. Decorate the stick with beads, feathers, markers and other decorating supplies.
  6. Turn the rain stick up and down and listen to the sound of the rain.

September: Mandala Coloring Page

To color:

  • Click on the image to open it in full size.
  • Right click (or command click on mac) and save picture to your computer, and
  • Use Paint or a similar program to color on your computer, or
  • Print the picture and color it with crayons, paint, glitter…whatever!

Ch-ch-ch-chia Fresca & Pudding

Chia seeds (chia hispanica) are amazing and nutritious. The originate in Mexico, where they have been cultivated for centuries. In fact, Aztec warriors used to carry chia seeds with them when they went into battle, and they were sometimes referred to as “runners food” because, it was said, eating just a small amount of these tiny, lightweight seeds could sustain the scout runners and warriors for an entire day. A chia seed can also hold up to TEN TIMES its weight in water! You’ll see how holding onto so much water gives the shell a slippery gel coating that allows us to make recipes like chia pudding. It also helps YOU stay hydrated (which means you have enough water in your body) because that gel coating of water and electrolytes is released slowly, as they make the journey through your digestive tract.

Today, scientists have discovered that chia is good for: balancing insulin levels and helping prevent diabetes, burning fat and providing loads of essential fatty acids, vitamins, nutrients, and fiber. They’re good for your guts, bones, skin, and brain!

Let’s do some warrior poses and eat some tasty chia treats!

Chia Fresca

In Mexico, chia fresca is made of fruit juices combined with chia to make a gelatinous, cooling drink for summer. It’s typically made with lemonade, but all kinds of juices can be used! Let’s make a pitcher of chia fresca. It’s both filling and light, which makes it a perfect drink-snack for hot summer days.

Chia con Limonada (chia with lemonade)

(Makes one pitcher, or four glasses)

  • 48 oz cool water
  • 4 large lemons
  • 1/4 c of sugar (or sweetened to taste with your favorite sweetener)
  • 2 Tablespoons of dry chia seed

(a single glass)

  • 12 oz water
  • 3 teaspoons lemon juice (about 1 lemon)
  • 1 teaspoon dry chia seed
  • 2 teaspoons sugar (or sweeten to taste with your favorite sweetener)

Note: If you’re using a type of juice that is already sweet or sweetened, you do not need to add any additional sugar

Stir all the ingredients together except the chia and make sure the sugar or sweetener is dissolved in the water. Add the chia seeds and allow the chia drink time to gel in the refrigerator. You will need to wait at least 4-6 hours for the chia to gel. You can make it before you go to bed and leave it to fully gel overnight. This lasts about five days in the fridge (but you’ll probably drink it all up before that!).

Chia Pudding

Chia pudding can be made into lots of flavors, using a variety of ingredients.

What you need, per serving of pudding:

  • 1 cup of a creamy ingredient, like milk, almond milk, coconut milk, etc.
  • 3 Tablespoon of dry chia seeds
  • fruit juice, cocoa powder, or extract (like vanilla extract) for flavoring
  • Sweetener, as needed (Sugar, honey, agave syrup, stevia, etc.)
  • Optional: nuts and cut up, fresh (or frozen) fruit, shredded coconut, flax meal — for extra texture and flavor

You may also like this a little thicker, to make it extra pudding-like; or thinner, so you can drink it. You can add extra chia seeds to thicken it, and fewer chia seeds to make it thinner.

Mix all the ingredients well, and then add the chia seeds and shake or stir them in as much as you can. It’s helpful to put each serving, if possible, into a 1/2 pint jar with a lid so you can shake it up halfway through the gelling process. This keeps the chia seeds from settling to the bottom and clumping into a hard mass. Usually if you can shake it up a few times during the first hour and a half, it won’t clump, even if you leave it to fully gel overnight. I like to make this at bedtime so it’s ready for breakfast!

If you want to blend fresh fruit into your pudding so the whole pudding is flavored (versus using pieces of cut fruit), put all the ingredients into a blender – EXCEPT the chia seeds (this is important; they will not gel if the seed coating is broken) – and puree, adding the chia seeds to the blended mixture right before it gets sent to the fridge.

Follow these basic directions for all the recipes below. Lasts for about 4 days in the fridge.

Chocolate Chia Pudding

  • Coconut milk
  • 1 1/2 T cocoa powder
  • 2 Tablespoons sugar

Horchata Chia Pudding

  • Rice milk
  • 1/2 teaspoon vanilla extract
  • 1/2 tsp ground cinnamon

Vanilla Chia Pudding

  • Any creamy base “milk”
  • A little sweetener
  • 1/2 teaspoon extract

Fruity Chia Pudding

  • Use 1/3 cup of berries (blueberries, strawberries, raspberries), or 1/2 large banana, or 1/4 c fruit juice
  • Use only 3/4 cup of creamy base
  • Sweeten if needed

Use a blender to blend chunky fruits and base mixture together before adding chia and refrigerating.

Be creative! What delicious flavor combinations can you come up with?

Math Medley

Using the one-serving size as your starting point, how much of each of the ingredients would you need to make enough servings for your family? Or for each morning of your school week (five)?

Laughing Language

Since chia fresca is a Mexican creation, can you learn to say all the ingredients of your chia treats in Spanish? Here are a few to get you started:

    • Milk – leche
    • Fruit – frutas
    • Lemon – limón
    • Strawberry – fresa
    • Vanilla – vainilla

What else are you using in your favorite chia recipe?

Ecological Echoes

Chia is one of over 3500 species of plants belong to the mint family — called Lamiaceae. All members of this family of plants have simple leaves that are directly opposite of each other on square stems, with five-petaled flowers that are fused into what looks like a single upper petal and one lower petal. All members of the mint family may not be tasty, but they are all edible. Some other members of the mint family include peppermint, spearmint, basil, lavender, marjoram, rosemary, savory, and thyme. Different types of mint grow all over the world…can you identify any wild mint plants in your local wildlife area?
Hurricane Harvey

Hurricane Harvey touched down in Texas on August 25, 2017. What is a hurricane? Why is it called Harvey? How does it compare to other storms? And what can you do to help?

What is a hurricane?

A hurricane is a type of intense tropical storm that forms over water. To be a called a hurricane, storm winds must be stronger than 72 miles per hour. When wind is that strong, it can knock down houses and trees  — causing major destruction.

A hurricane can be further defined by it’s “category.” A category 1 hurricane is the mildest, with winds between 74-95 miles per hour. A category 5 hurricane is the most severe, with winds upwards of 157 miles per hour.

Hurricanes can shift between categories as they shift in form. When Hurricane Harvey touched down, the winds were as strong as 130 miles per hour, making it a category 4 hurricane.


Why is it called Harvey?

The World Meteorological Organization is responsible for naming tropical storms. The practice has been in place since the 1950s when people realized that giving the storms easy-to-remember names helped in communication among emergency responders.

The names alternate between genders and some examples of previous hurricane names include Katrina, Sandy and Matthew. Tropical storm Harvey was named on August 17, 2017. It wasn’t considered a hurricane until August 24, one day before touching down.


How does Hurricane Harvey compare to other storms?

The strength and size of Hurricane Harvey is comparative to other tropical storms in our country’s history. However, what makes Hurricane Harvey different is the amount of rainfall that continued after it’s initial touchdown.

According the National Weather Service, Texas has received over 50 inches of rain — a record for any storm in the continental United States. (Hurricane Katrina, which happened in 2005, only had 17 inches of rainfall.) This equals to trillions of gallons of water in the city of Houston.


What happens now? And how can you help?

Areas in Texas affected most by Hurricane Harvey will have a long road of reconstruction ahead. Many, many people are displaced after leaving their homes and all their belongings to find safety from the flood waters.

Fortunately, at times like this, we find unity and humanity by helping one another. You can help too. Talk to a grown-up to see what you can do. Many charitable organizations (American Red Cross, Save the Children) are accepting Hurricane Harvey relief money. We can’t think of a better way to spend your allowance this month.


We All Win: Rock, Tree, Bridge!

This is a great game to play with friends! Get into a wide circle and have everyone get into alternating poses of Child’s Pose (rock), Tree, and Bridge. Then, one person gets up and goes around the circle stepping over the rock, walking around the tree ,and through or under the bridge.

Move slowly and mindfully so as not to disturb the rocks, trees and bridges. Work together to get through the obstacle course without a tree falling over or a bridge breaking! Everyone gets a turn.


Child’s Pose Instructions: Begin in Heel-Sitting pose. Open your knees a little, so your belly relaxes between your thighs. Bend at the hips and fold forward, letting your shoulders drop down away from your ears and spine. Your arms lie back along the sides of your legs with open palms facing upward. Place your forehead on the floor. Turn your head to one side and take a few breaths. Then, turn to the other and do the same.


Tree Pose Instructions: Begin in Mountain Pose. Lift one foot and press your foot against the inside of your other leg. You can use your hand to place your foot anywhere between your ankle and inner thigh. Avoid the knee joint. As your balance gets stronger, you’ll be able to raise your foot higher up your leg. Bring your hands to your chest, palms together in Namaste position. Then raise your arms up above your head. Stretch them out wide, like the branches of a tree. Separate your fingers. Balance and breathe. Now repeat on the other side.


Bridge Pose Instructions: Lie on your back with your arms by your sides. Place your feet hip-width apart as close to the sit bones as possible. Press your feet into the ground and lift your hips to the sky. Place your hands however it’s comfortable to support your lower back and pelvis. Lift your chest and arch your spine.


Flamingo

Flamingo Pose

Flamingos are born with soft gray feathers. Around their 3rd birthday, their color turns flaming pink or orange. That’s quite a birthday present! Their feathers are orange and pink because their diet of algae and shrimp are high in carotenoids. Carotenoids are what give carrots their orange hue and make cooked shrimp pink…like a flamingo’s feathers! If the flamingos stopped eating this type of diet, its feathers would eventually go back to being white.

Instructions

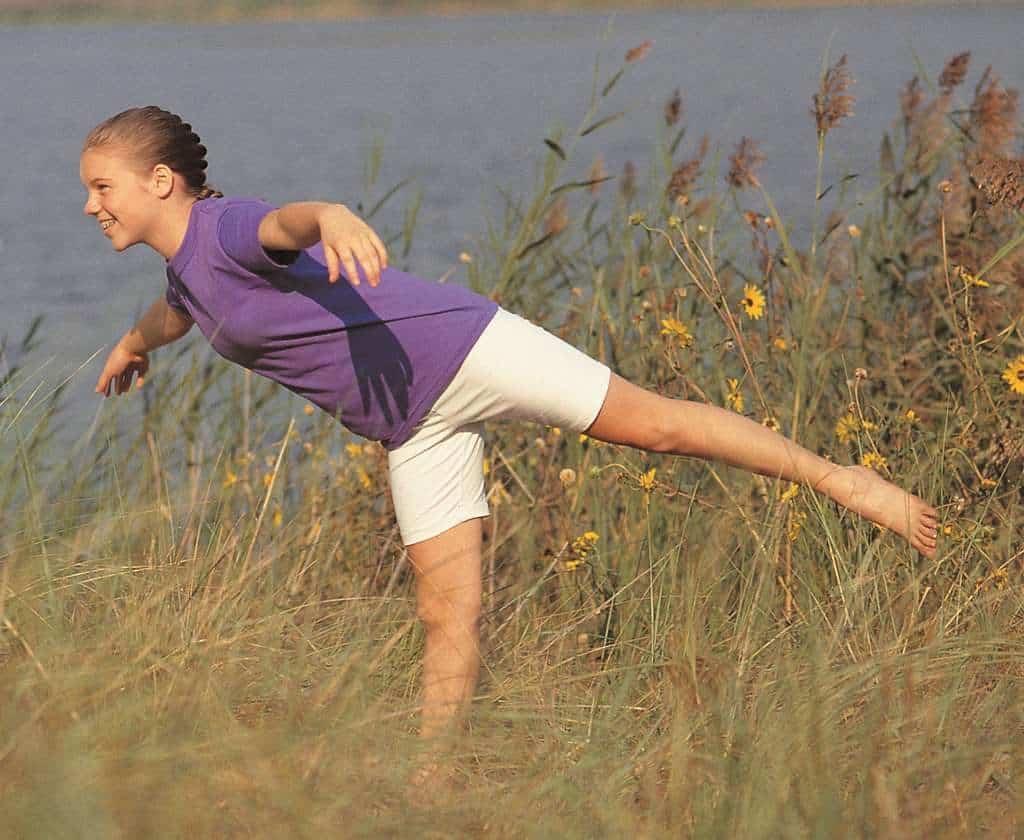
  1. Begin in mountain pose.
  2. Spread your arms open like graceful wings as your left leg extends straight back.
  3. Bend forward at the hip hinge.
  4. Establish your balance little by little as you adjust your arms and back leg.
  5. Clear your mind and fix your attention on your breath, body and focusing friend. Notice when your thoughts are scattered, your pose is unsteady too.
  6. If you feel like flying, gently flap your wings Repeat with the opposite leg.

Do both sides 2-3 times.

Activity Ideas for Home or Classroom

Ecological Echoes
A flamingo flies with its head and neck stretched out in front. And, unlike other feathered friends, flamingos bend and stretch their legs behind them when balancing. Can you feel the difference between stork and flamingo?

Math Medley
Flamingo wings are about 60 inches from tip to tip. How many feet is that? Hint: 1 foot = 12 inches What is your wingspan? Measure from fingertip to fingertip.

Body Benefits
Flamingo legs might look scrawny and spindly, but they’re not. This pose strengthens, shapes and tones the legs. The upper body may then experience a sense of feathery lightness. Praise your child as you see them become more graceful, poised and balanced.

Peanut Butter and Jelly

YogaKid in Peanut Butter and Jelly Pose

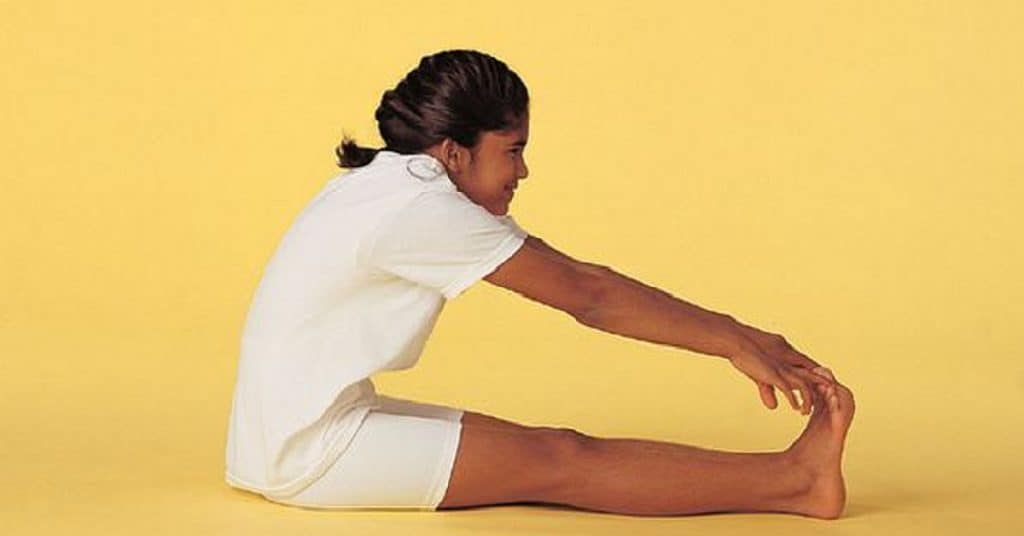
Stretch your whole body – arms, legs, toes, spine and fingers. Become gooey and sweet as you fold forward and make a peanut butter and jelly sandwich.

Instructions

  1. Begin in L is for Left. Reach up and grab the peanut butter and jelly jars that are floating through the air. Can you reach them?
  2. Rub PB & J all over your hands and smear it between your toes. Fold forward and make a sandwich by pressing your upper body towards your lower body.
  3. Spread it all over your legs and on your belly as you learn the names of your bones and muscles.
  4. Wash your face and hair in peanut butter and jelly.

Activity Ideas for Home or Classroom

Awesome Anatomy
Teach your children to learn the parts of their body with age appropriate anatomical names and words.

Body Benefits
When you fold forward at the hip hinge, like in this pose, it is called a forward bend. Forward bends stretch the hamstrings, calves and all the muscles of the back. In time, you will become more flexible and be able to lengthen your legs and spine more.

Math Medley
The average child eats 1,500 PB&J sandwiches before he or she graduates high school. How many is that each day, week, month, year, decade, century?

Bridge of Diamonds
In other countries, peanut butter is not as popular as it is in the US and Canada. In Australia, they eat Vegemite, in Italy, they eat pizza. In Mexico, tacos. Black beans and rice in Brazil. Chicken rice in Singapore. Pho in Vietnam.

Nutrition Tip
Since many of you just love PB&J, take it up a few notches with these healthy tips.

  • Start with a multi grain, whole grain bread. One fun way to get your kids involved is making bread. The easiest and fastest way is to use a bread machine. Children love to put in the ingredients before they go the bed at night, set the timer and wake up to the smell and taste of delicious, homemade bread. Yummy. And they are so proud of themselves too.
  • Try using a jar of natural or organic peanut butter. Try to avoid the peanut butters with partially hydrogenated oils – they have a long shelf life and lots of flavor but the trans fat are unhealthy and do not digest well in our bodies. Did you know you can make butter from all kinds of nuts: almonds, cashews, sesame, pistachio. Try it out.
  • How about bananas instead of Jelly? What else would taste yummy with peanut butter? Apples? Honey? Avocado? Experiment and explore. Look for jams made from the whole fruit. These are naturally sweetened without the addition of high fructose corn syrup and other added sugars.