Spooktacular Poses!


We LOVE Halloween! We love getting dressed up. We love eating candy. And we love adding a little bit of holiday fun to our YogaKids poses! Enjoy a few of our favorite spook-tacular poses…

Scarecrow/Ghost Coat Swing

Imagine you are a scarecrow hanging in a field. Your spine is the post that holds you up. Place your hands on your shoulders with your elbows out to the side. With the rhythm of your breath, twist your upper body (head, face, neck, shoulders, and arms) around the post of your spine. Breathe as you move back and forth, side to side. Gradually build up to 50 rounds, then 100. Return to center. Let your arms hang down. Twist your spine back and forth and just let your arms hang loose, as if they were empty coat sleeves. Allow them to fly like a ghost with the momentum of your breath and movement.

Black Cat (also known as Moo and Meow)

Begin in All Fours Pose. Line up your wrists under your shoulders. Spread your fingers wide and arch your spine to the sky. Loosen your neck and drop your head down. Breathe out long as you meow. Now lift your chest forward and look up with big cow eyes. Dip your belly down and tilt your sitting bones up. Your back will sink down like a cow’s. Make cow lips and moo deeply from the back of your throat. Go back and forth, meowing and mooing.

Broom Pose (also known as Birthday Candle)

Sit cross-legged. Take hold of your toes from the outer side of your knees. Breathe in and out. Roll backwards. Then, let go of your toes while bending your elbows. Use your hands to support and lift your back. Straighten your legs and lift them past your head until your bent toes touch the floor. Squeeze your shoulders and elbows together. Lift the legs straight up to the ceiling. Rest your weight on your shoulders and triceps. Life your chest. Your feet are the candle flames. Have someone light the candles, or blow with enough power to ignite the flame yourself. Wiggle your toes to make the flames flicker. Tuck your chin to keep your neck relaxed.

360 Degree Owl

Roll up your yoga mat and turn it into a tree branch. Bend your knees and perch on your branch. Find your balance and sit as upright as you can. Tuck your arms behind you. Gently flap your wings. Turn your head from side to side, opening your eyes wide. Make a gentle “who” sound.

Witch’s Hat Pose (also known as Down Diggety Down Dog) 

Begin in All Fours pose. Bend your toes forward. Spread your fingers wide. Press your doggy paws and heels downward as you lift your hips and tail to the sky. Lengthen your spine. Stretch your arms and legs as long as possible. Let your head hang down.

Dracula Pose (also known as Enchilada)

Roll yourself up in your yoga mat!


“Sugar-free” Crustless Apple Pie

“Sugar-free” Crustless Apple Pie

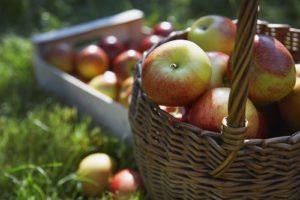
Basket of Apples
Apples in Basket

No sugar, no crust…is this even pie?

I guess it’s not technically pie, but it has all the right flavors and it’s delicious!

Apples have lots and lots of natural sugars, like most fruits. Along with bananas, apples have some of the highest natural sugar content of any fruit. Sometimes apples and apple juice are even used as sweeteners, instead of processed sugar, for organic and natural desserts.

What does processed mean when we’re talking about sugar? The white granular sugar you may see in your home is usually made from these two plants:

Sugar cane is a type of grass that is packed full of natural sugar. Sugar beets are beet plants with very sugary roots. When they are processed, the cloudy brown, sugary juices are squeezed out of the plants by machines. The water from the juice evaporates, and brownish sugar crystals are left over. Sometimes these brown sugar crystals are sold as sweeteners. Sometimes, they are cleaned even more, pulling out all the minerals and vitamins and leftover microscopic bits of plant matter, until it is sparkling and white, leaving only the sugar behind. This is what we call table sugar. It is as pure as sugar gets.

It’s OK to have this type of sugar in moderation, meaning sometimes, and in small quantities. But it’s better for your body if you can enjoy sweets in their natural form, like eating a whole apple or banana.

We’re going to make a delicious apple-pie-like dessert, with only the sweetness of the apples themselves for sugar!

Ingredients:

  • Four large sweet apples, cored, skinned (optional), and sliced thinly. (Try Pink Lady, Gala, Fuji, Jonagold type apples)
  • 1 teaspoon cinnamon
  • 1 teaspoon nutmeg
  • 1/2 teaspoon salt
  • 1 Tablespoon flour or gluten-free flour
  • 1/4 cup water
  • 3 Tablespoons of slightly melted butter or margarine (don’t get it too hot, or it will burn you!) *

Instructions:

Preheat your oven to 350 degrees.

Put all the dry ingredients into a mixing bowl and combine well. Melt the butter in the microwave for 10-15 seconds. Add the apples and toss them into the mixture to lightly cover them with the spices and flour. Now add the water and melted butter, and smoosh it all around with your fingers until all the apples are covered with the spices and flour mixture. Spread everything out evenly in an 8×8″ baking pan and bake for about 40 minutes, stirring the apples every 10-15 minutes.

What you will end up with is an ooey-gooey apple pie filling that you can eat just like it is for a healthy snack or dessert, put on top of ice cream, or add to a bowl of granola. Yum!

* Vegan Option: Replace butter with coconut oil.


Springtime Yoga Poses

Springtime Yoga Poses! Spring is such a magical time… and here in the Magical Garden, we LOVE IT so much! The weather gets warmer and flowers begin to bloom. It’s a time for bunnies, butterflies, and flying kites. Join us in celebrating spring with some of our favorite YogaKids poses! Reach for the Sun Begin … Read more

Pot O’ Gold Craft

Pot O’ Gold Craft

St. Patrick’s Day is on March 17th of every year. St. Patrick’s Day is an Irish holiday honoring Ireland’s patron saint. In Irish language, it is called Lá Fhéile Pádraig, or “the Day of the Festival of Patrick,” St. Patrick’s Day celebrations are a way to celebrate Irish culture, where it is a national holiday. In fact, it is observed (celebrated) in more countries around the world than any other national festival.

Ireland is a European country, but it’s not attached to the mainland. Rather, it is an island in the North Atlantic off the coast of Great Britain. It is sometimes called “The Emerald Isle.” The cool climate and lots of moisture from the ocean air is what keeps Ireland so green.

A leprechaun is one type of fairy from Irish folklore. They are usually portrayed as mischief-making little men with red hair, wearing green hats and coats. Legend says, if you catch a leprechaun, he will have to take you to his secret pot of gold at the end of the rainbow.

Let’s learn about rainbows while we make our own pot o’ gold!

POT O’ GOLD CRAFT

  • Cotton balls
  • Red, orange, yellow, green, blue, and purple paint or markers
  • Six popsicle sticks
  • Glue
  • Black construction paper
  • White construction paper or cardstock
  • Shiny gold buttons, paper, or bells – anything that can be glued on to look like gold coins
  1. Color one popsicle stick with each color.
  2. Cut out a cauldron (pot) shape from the black construction paper about 4-5″ across.
  3. Glue the popsicle sticks, color side up, to the back of the pot, so it looks like a rainbow is disappearing into it.
  4. Cut a cloud shape out of the white paper
  5. Glue cotton balls on top to make it look more like a cloud
  6. Glue the cloud on top of the opposite end of the rainbow from the pot
  7. Cut out and/or glue your gold pieces to the top of the pot

*Optional: only make the cloud and the rainbow, and stick the “pot end” of the rainbow into a bowl with gold-wrapped chocolate coins for a tasty party decoration.

About Rainbows

Rainbows are made up of six colors in the visible spectrum of light. Some people use the acronym ROY G BIV to remember the colors: Red Orange Yellow Green Blue Indigo Violet. Rainbows form when white sunlight enters tiny droplets of water — called water vapor — suspended in the sky, and breaks apart into all the colors that make up what we call “white.”

The area around a rainbow is brighter than the dark sky behind it because the water droplets are both refracting (bending, breaking) and reflecting (bouncing off) the light. The reflection magnifies the white light, while the refraction makes a rainbow.

You can make your own rainbow by shining white light through a prism, which is a type of crystal that bends light and breaks it apart into its separate colors.

If you want to find a rainbow in nature, you should look toward a dark, cloudy, rainy sky with the sun at your back. You will then be at the right angle to see a rainbow if one forms.

Did you know?

A rainbow is actually a full circle of light, but because of where we are on the earth, we usually only see half of it — in a bridge shape. Can you do Bridge pose and be a rainbow?

There are even “moonbows,” which are rainbows that form in the halo of light around a bright moon!

Sometimes you can find rainbows on a perfectly sunny day in the mist that comes off of garden hose sprayers and sprinklers. And of course, with your prism, which you can leave in a sunny window so there are always rainbows when the sun is shining through the glass.

Unfortunately, you can’t touch a rainbow because it is just made of light, and because the light will only be visible from the right angle, there is no end to a rainbow. So if you catch a leprechaun, it might be better to apologize and offer him a chocolate coin before you let him go, because that pot of gold at the end of the rainbow is just a myth; a trick of light.

Spring Daffodil Craft

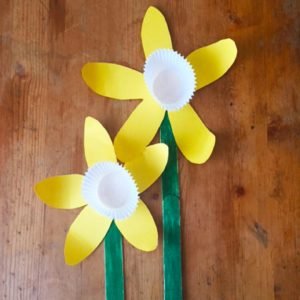
Spring Daffodil CraftDaffodil Craft

We’re celebrating spring with a super easy and adorable daffodil craft.

What is Spring?

How do we know when spring begins? Spring falls around March 20 each year at the time of the spring equinox. An equinox happens when the duration of day and night are approximately the same length of time (12 hours day, 12 hours night) all over the world. So even though it might still be snowing where you live, the spring equinox will always happen at the same time of year, all over the world, because of the way the Earth tilts on its axis as it rotates around the sun.

Usually when we talk about spring, we are talking about the seasonal time when the browns and greys of winter begin to give way to colorful spring blooms, and new, green baby leaves and grass begin to unfurl on their branches and poke up from the ground. Even in places that do not reach freezing temperatures in the winter, and places that stay green all year ’round, spring brings big changes in weather.

Where I live now, in Southern California, it is green and cool most of the winter. It doesn’t rain in the summer here; instead, we have a monsoon season, in which most of our rain falls all at once during the winter, over just a couple months. It is mid-February here, and while some of my friends who live to the north of me are still getting snow, the fruit trees are already flowering here, and the weather is warm and balmy. Soon, there will be fields and fields of golden California poppies – the reason California is called The Golden State. Those poppies and many desert wildflowers are the spring flowers Californians enjoy, while you may see daffodils, tulips, crocuses, rhododendrons, or hellebore if you live further north. Do you know the names of the spring flowers where you live? The latitude of where you live affects what kind of winter you will have. Do you know how to find your latitude? 

In the summer here, it is very dry; so much that all the dried up grass in the foothills and mountains turns gold and remains dead until the first rains at the beginning of winter. When I was a kid, I lived in places like Texas and Indiana, where it rained throughout the year, and experienced what we think of as “traditional” seasons: an explosion of flowers in the spring after a long, colorless winter; hot, green, muggy summers; crisp autumns with changing leaves; and cold, sometimes snowy winters.

Those of us who live in the Northern Hemisphere (North and Central America, Europe, most of Asia, and northern Africa) call March “spring,” and September “autumn.” Did you know that, in the Southern Hemisphere (Africa, South America, Australia, and some southern islands of Asia), it is completely opposite?  Australians celebrate Christmas in the summer!

What is the weather like where you live? What time does spring come, and how do you know (meaning, do you know because you see specific flowers or animals that you do not see in the winter)?


Colorful Daffodil Decorations

What you need: 

  • Yellow construction paper
  • Paper mini-cupcake holders
  • Scissors and adhesive
  • Wood craft sticks
  • Green paint or marker
  1. Cut out the daffodil shape from the yellow paper.
  2. Adhere a cupcake wrapper in the center, to look like a daffodil’s “trumpet.”
  3. Color your craft stick green on one side and glue it to the back of the daffodil to make a
    stem. You may use more than one stick if you want longer stems.
  4. Curl the edges of the petals forward slightly.
  5. Put your daffodils all around to chase away the winter blues!
  6. Daffodils come in many shapes and sizes. Can you figure out how to make some of the colors of daffodil, pictured at the top of this article?


Presidents’ Day Cookies (Abe & George)

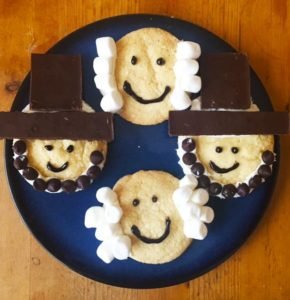
Presidents’ Day Cookies (Abe & George)President's Day Cookies

What better way to honor some of our founding fathers than with a sweet treat in the likenesses of George Washington and Honest Abe?

Start with Nilla Wafers or Easy-Peasy Sugar Cookies.

Using big cookies, full-size chips and baby marshmallows

You will need:

  • Cookies (fully cooled)
  • Chocolate bar that’s divided into sections (if you need to cut the chocolate, dip the blade of a sharp knife in hot water for a few seconds so the chocolate doesn’t break)
  • Black gel icing
  • Regular chocolate or vanilla icing (homemade royal icing would work the best, but we just grabbed a tub of cake frosting off the shelf for this project)
  • For small president cookies, use mini-marshmallows (dehydrated, for hot cocoa — you can sometimes find these in shaker canisters in the baking aisle), mini-chocolate chips
  • For large president cookies, use mini-marshmallows, full-sized chocolate chips

Use the icing to attach the hats, chocolate chips, and marshmallows to the cookies, then draw on little faces with the black icing. You may need to let the icing set for about half an hour so Abe’s candy bar hat will stay on as you serve the cookies.

About Presidents’ Day

This year, Presidents Day falls on Monday, February 20, 2017. February 22 was George Washington’s birthday, and Presidents Day began as a day to honor our very first president. For what presidential actions were Abraham Lincoln and George Washington most well-known? Who is your favorite president, and why? Can you name the Presidents in order? Here is a list of the US Presidents, from the founding of this nation to the current day.

  1. George Washington, 1789-1797
  2. John Adams, 1797-1801
  3. Thomas Jefferson, 1801-1809
  4. James Madison, 1809-1817
  5. James Monroe, 1817-1825
  6. John Quincy Adams, 1825-1829
  7. Andrew Jackson, 1829-1837
  8. Martin Van Buren, 1837-1841
  9. William Henry Harrison, 1841
  10. John Tyler, 1841-1845
  11. James Knox Polk, 1845-1849
  12. Zachary Taylor, 1849-1850
  13. Millard Fillmore, 1850-1853
  14. Franklin Pierce, 1853-1857
  15. James Buchanan, 1857-1861
  16. Abraham Lincoln, 1861-1865
  17. Andrew Johnson, 1865-1869
  18. Ulysses S. Grant, 1869-1877
  19. Rutherford Birchard Hayes, 1877-1881
  20. James Abram Garfield, 1881
  21. Chester Alan Arthur, 1881-1885
  22. Grover Cleveland, 1885-1889
  23. Benjamin Harrison, 1889-1893
  24. Grover Cleveland, 1893-1897
  25. William McKinley, 1897-1901
  26. Theodore Roosevelt, 1901-1909
  27. William Howard Taft, 1909-1913
  28. Woodrow Wilson, 1913-1921
  29. Warren Gamaliel Harding, 1921-1923
  30. Calvin Coolidge, 1923-1929
  31. Herbert Clark Hoover, 1929-1933
  32. Franklin Delano Roosevelt, 1933-1945
  33. Harry S. Truman, 1945-1953
  34. Dwight David Eisenhower, 1953-1961
  35. John Fitzgerald Kennedy, 1961-1963
  36. Lyndon Baines Johnson, 1963-1969
  37. Richard Milhous Nixon, 1969-1974
  38. Gerald Rudolph Ford, 1974-1977
  39. James Earl Carter, Jr., 1977-1981
  40. Ronald Wilson Reagan, 1981-1989
  41. George Herbert Walker Bush, 1989-1993
  42. William Jefferson Clinton, 1993-2001
  43. George Walker Bush, 2001-2009
  44. Barack Hussein Obama, 2009-2016
  45. Donald John Trump, 2016 (current)

Happy Presidents’ Day!

ASL Valentines Day Card

Animal Hand-tlersASL Valentine's Day Card Craft

Valentines Day falls on February 14 every year. The real history of Valentine’s Day is a little confusing. It began as two different pagan festivals that were later adopted by the Catholic Church as an entirely separate festival honoring two men (both named Valentine, who were executed on Feb. 14 in two different years, by a Roman emperor) who were later declared Saints. So while the story of Valentine’s Day has some dark and unclear origins, today we exclusively celebrate the holiday to spread love and fond wishes (and little candy hearts).

The people of Earth speak a multitude of languages. What languages do you speak? How do you say “I love you” in your native language? Do you know how to say “I love you” in any other languages?

Here is how we say “I love you” in some of the world’s most widely spoken languages. You can look up videos online for instructions on how to pronounce these words. Can you match the languages to the countries whose people speak them? Can you find those countries on a world map?

Chinese: Wǒ ài nǐ

Spanish: Te amo.

Arabic: ‘Ahabak

French: Je t’aime

Japanese: Watashi wa, anata o aishiteimasu

Hindi: Main tumase pyaar karata hoon

Russian: Ya lyublyu tebya

Portuguese: Eu te amo

Bengali: Āmi tōmāẏa bhālōbāsi

Javanese: Kangen


Today, we are going to make a Valentine’s Day card in ASL – which is short for American Sign Language. ASL is the beautiful language that people who are hearing impaired “speak” with their hands.

Materials & Instructions

  • Colored paper – one sheet in your flesh color and one in the color you want for the card’s background.
  • Glue
  • Markers, crayons, pens, etc.
  • Glitter or other decorations (optional)
  1. Trace your hand and a little bit of your wrist on a piece of paper the color of your skin.
  2. Cut it out.
  3. Fold the other colored piece of paper in half to make the card.
  4. Glue just the palm of the hand and the wrist section to the card, leaving the fingers loose.
  5. Now, place a tiny dot of glue on the tip of the pointer finger, pinkie, and thumb, and glue those fingers in place.
  6. Fold (don’t crease) the middle two fingers down to the palm of the hand and, using a small drop of glue on the very tip of each of those fingers, attach them in place to look like the picture.
  7. Now add your own message of love to the inside and outside of the card and give it to a person you love!

Happy Valentines Day!

Snowman Glitter Shaker

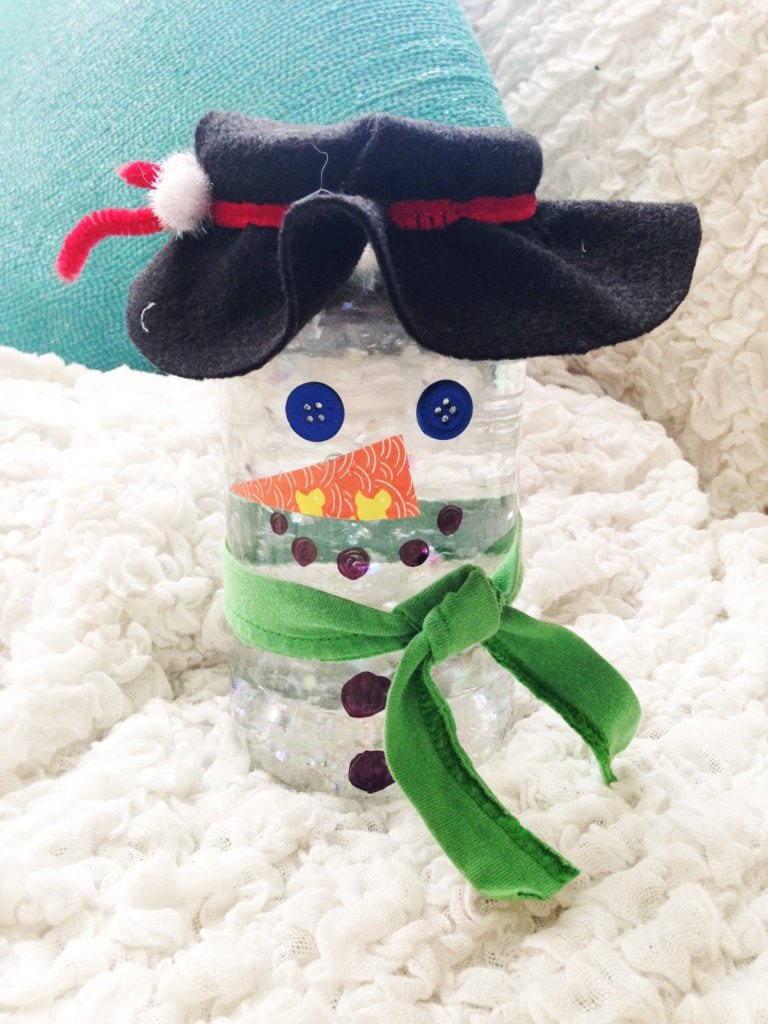
Snowman Glitter ShakerSnowman Glitter Craft

Supplies

  • One jar with a screw on lid (like a pasta sauce jar)
  • One 12”x12” piece of felt for the hat
  • Hot glue
  • Glycerin
  • A ribbon or other piece of fabric for the scarf
  • A pipe cleaner for the hat
  • A small piece of orange paper, cut into a triangle, for the carrot nose
  • A black sharpie for eyes and buttons
  • Other decorations, like jingle bells and pom-poms for the hat, or buttons for the eyes, mouth
  • Water
  • Plastic glitter in large and small sizes.

Instructions:

You may adjust the glycerin-to-water ratio for the size of your jar – I am using a 24 oz. jar in the example.

  • Remove the label and scrape off any leftover glue. Make sure the jar is completely dry.
  • Begin by tying the scarf onto the jar and adding a dot of hot glue to the front and back, between the ribbon or fabric and jar, to hold the scarf in place.
  • Glue on button eyes or draw on black circles for eyes, mouth, and buttons. Glue on the nose.
  • Trace a circle onto the felt using a bowl, and cut it out. Note: Using the lid of your jar as a guide, you should have no less than 1” extra fabric all around. I have about 1.5” margins on mine.
  • The larger the circle, the floppier the hat.
  • Add ¼ cup of glycerin and about 1 cup water. Put the lid on the jar and shake until mixture is homogeneous.
  • Put a maximum of 2 Tablespoons of plastic glitter into the jar, then fill until about 1” from the top of the jar. Put the lid on and make sure you like the consistency of the water and glitter. If you want to add more glycerin to make the glitter move more slowly, add it now and mix well.
  • Once you’re happy with the water viscosity, fill the last remaining space up to the brim and put the lid on. Dry any water spots that may have leaked out, and hot glue around the base of the lid.
  • Center the circle of felt on the lid and hot glue it in place.
  • Crimp the felt as needed to get the shape of hat you want, and wrap the pipe cleaner tightly under the base of the lid, twisting the ends to hold it together. You will probably need more than one set of hands for this step! Add decorations, like pom-poms, silk flowers, or a bow) over the place where you twist the pipe cleaner closed.
  • Let it snow!

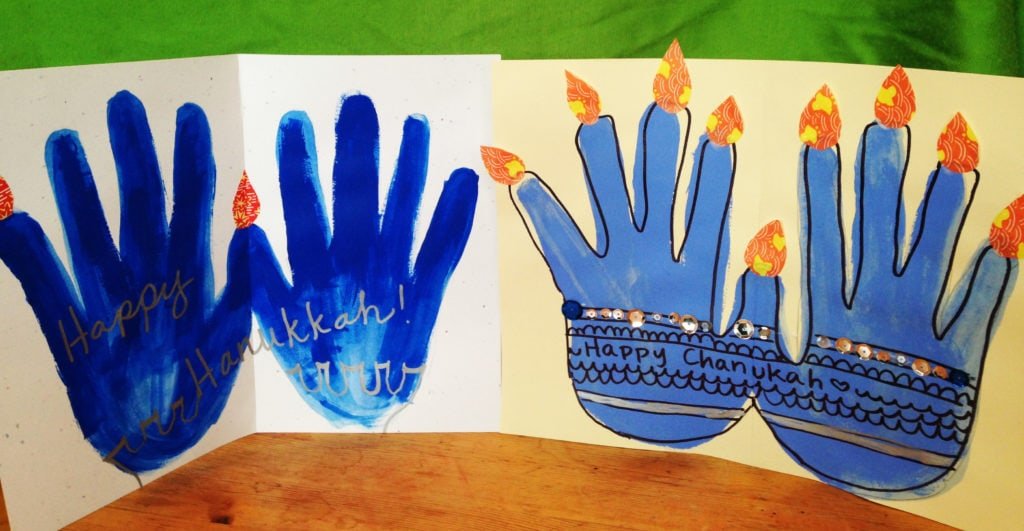
Handprint Menorah

Handprint MenorahHandprint Menorah

Supplies:

  • Patterned or brightly colored paper to use for candle flames
  • A piece of card stock
  • Tempera or other water based paint in the color you want your menorah
  • Scissors
  • Glue or glue stick
  • Metallic sharpies, paints, sequins, etc. optional – for decorating the menorah

Instructions:

  • Fold the card stock in half, and then unfold it. Lay it flat.
  • Placing your left hand on the left side of the paper, with your thumb straight up, across the center fold line.
  • Trace your hand, then repeat on the right side, with your thumb in the same place as the left thumb.
  • Paint inside the lines you just traced.
  • Allow paint to dry and then decorate over the top of the menorah.
  • Fold the piece of paper you’re using for flames in half. Draw five flame shapes and cut them out of the folded paper to make ten flames. (That’s one left over)
  • Glue a flame in the center, then “light” one finger of the menorah for each night of Chanukah.
  • Keep the extra flames in an envelope nearby so they don’t get lost, and enjoy the Festival of Lights!

Handy-bird Decoration

(Originally published in the 2016 YogaKids Holiday Family Fun Guide)

Supplies:

  • 1 wooden craft stick for each bird
  • Scissors
  • Brightly colored tempera paint (or other water based paint, watered down enough to make a hand print)
  • One sheet of any-colored colored card stock or construction paper
  • Paint, sharpie, or marker in a color that will show up on your paint
  • Whatever color paper you want to use for your bird’s beak
  • Glue
  • Googly eyes and other decorations, like pom-poms or glitter — optional

Instructions:

  • Brush a thick layer of paint onto a surface that’s flat enough to place your hand on, like a flat dinner plate or baking pan.
  • Place your hand, palm down, into the paint and roll it slightly to make sure the palm is covered
  • Press your hand onto a sheet of paper and lift it back up without moving it around on the paper
  • Let the paint dry before cutting around it.
  • Decorate your bird.
  • Glue one end of the popsicle stick to the back of your bird and draw little feet on the stick with a permanent marker or paint. Make sure the popsicle stick extends onto the paper by an inch or more to keep your bird from flopping over.
  • Stick your bird into a houseplant or holiday centerpiece for extra cheer!
  • Do you live in a very cold place? Maybe your bird needs a scarf or a warm hat. Use construction paper and other fun materials, and decorate to your heart’s content.