Bunny Breath

girl doing bunny breath pose

Bunny Breath is a quick pick-me-up that will give you energy and focus. It is especially helpful for children with ADD and ADHD.


Pose Instructions

  1. Sit on your knees like a bunny.
  2. Keep your chest lifted and your shoulder blades descending down the back.
  3. Tuck your chin in slightly and let your lower jaw relax.
  4. Get your nose ready for breathing by twitching it like a bunny.
  5. Take 4 to 6, short, quick breaths in through your nose.
  6. Breathe out through your mouth with a long, smooth sigh,
  7. Increase the number of inhalations and double the length of your exhalation as your breathing power grows stronger and stronger with time and practice.

Activity Ideas for Home or Classroom

Bridge of Diamonds 

“Allogrooming” is what rabbits do to take care of one another. If one bunny is disabled in some way, a friend will groom her. If a rabbit is blind, his companion doesn’t leave his side. Helping each other is important for people and animals.

Body Benefits 

This breath cleans the inside of your body like a washcloth and soap cleans the outside.

Brain Balance 

The rapid intake of oxygen inherent when practicing the bunny breath awakens the brain. Tune into learning readiness and get smart!

Laughing Language 

Bunnies ears are their “thermoregulators.” That is a fancy word for their bodies natural air-conditioning and heating system. They release heat through their ears to cool their body down and then adjust their internal organs to the right temperature for perfect comfort in the hot or cold weather.


Mountain

child in mountain pose
p107 re

Mountains represent majesty and solidness. Can you stand tall and proud, yet relaxed and still on your own two feet? The mountain pose looks very simple. You just stand there. Yet, there is much to be aware of in the body. This pose promotes correct posture.


Instructions

Stand rooted with your feet together or your feet hip width apart. However you feel most comfortable on your own two feet. The feet are the foundation. Sink both feet into the floor. Stretch downward through the legs. The more you ground downward the more you will be able to stretch upward and skyward. through your spine, belly and the top of your head.

Let’s see how well our feet can listen to the directions of our brain! Tell your toes: Big toes stay on the floor. Others lift up. Good. Tell your heels to lift up and open from the center. Place your heels back down. Were they good listeners? Now tell the big toes to lift up. All others stay on the floor. Well done!


Activity Ideas for Home and Classroom

Body Benefits

It takes time and practice to feel proper form and alignment in the body. Practicing the mountain regularly will promote stillness in the mind and body.

Quiet Quests

Experience your breath flowing through your Mountain body. Upward and downward from the earth to the sky. We are the conduits of this natural flow and exchange of energy. Take 3 to 5 breaths. Increase with time and practice.

Laughing Language

Tell or write a story as if you were the mountain. Where are you? How big are you? Does a volcano live inside of you? Do children snowboard or ski on you? Do you have water? Trees? Houses?


‘Tis the Season of Patience

YogaKid in Peanut Butter and Jelly Pose

Sitting in a circle, legs stretched straight out in L-Sitting Pose, we raise our arms to sit up even taller. We then reach for our toes in Peanut Butter and Jelly Pose. Some of the kids groan or sigh as they discover the furthest they can touch is not much past their knees. Then they see others in the class who can reach further than them. This comparison may lead to frustration with the pose, which can translate to irritation with oneself. Overstretching can occur, some of the kids wanting to reach their toes NOW.

We may not get to touch our toes today. We may not even achieve it in a few sessions. It might take much longer than that. It hinges upon what we are told is a virtue: patience.

In exploring this forward fold asana I see a valuable lesson about patience unfolding. Patience can be defined as the ability to wait calmly, the capacity to accept delay without getting angry. This subject is so timely with the holidays quickly approaching. I’m thinking about this while going about my daily routine — one that includes being stuck in traffic and waiting in lines at the grocery store. As the holidays loom closer, the lines will get longer and tempers will get shorter. There will be more rushing about and even more frazzled nerves. And it makes me wonder, where is patience? And if I don’t have patience, how can it be cultivated?

The seeds of patience must be sown and nurtured within ourselves before we can express it towards others. I have to be patient with myself first. If I cannot be patient with myself, then how can I expect to be patient with others? I work on studying patience within my own practice, noticing that how far I can reach may vary from day to day. I may have to make adjustments and modifications. And hopefully this acknowledgment of where I am is how I view where others are within and beyond the yoga studio.

Revisiting PB&J Pose, we work on determining and then accepting where we currently are in the pose. I assure one student that she is where she needs to be right now if she can only comfortably reach halfway to her toes. The added stretch will evolve with time and practice. We set small goals to slowly progress to the next level. Is this easy? No. Is there still frustration? Most likely! But at least this learning experience is a start in developing patience and self-acceptance. When we are less hurried and impatient with ourselves maybe we can then be less hurried and impatient with others. We become calm. We are more focused and tolerant. We see our goals as possible. We persevere.

“Patience is being like the ocean, slowly taking back the sand on the beach. It is in no hurry, because it knows eventually it will gain, or regain what it desires.” – Brian Martin


Change your life… and the world — as a Certified YogaKids Teacher!

Bow and Arrow

Bow and Arrow Pose

Archery is one of the oldest sports and requires skill, focus and concentration. The Bow and arrow was originally developed for protection and survival. Someone who makes bows is called a bowyer.


Instructions

  1. Begin sitting down with your legs straight out in front of you.
  2. Clasp your big toe. Bend your knee.
  3. Inhale. Pull the “bow” back behind you.
  4. Exhale. Shoot the arrow skyward and across your other leg. Make a whooshing sound like a speeding arrow moving through the air.
  5. Maintain a long and tall spine as you practice your seated archery.
  6. Use the other arm and hand to press into the floor and support the lift of your spine.
  7. Do this 6 times. Change sides.


Note for Parents and Teachers

Many children shoot the leg straight ahead or out to the side. This is common but not optimum. Help your child achieve the physical movement of crossing one leg over the other. It begins to make new grooves in the brain.


Activities for Home and School

Body Benefits
Bow and Arrow opens the hips, lengthens the hamstrings, gastrocnemius and soleus muscles of the leg.

Brain Balance
Crossing the midline of the body with this movement stimulates the 300 million nerve cells of the corpus callosum. The corpus callosum is known as the brain´s superhighway.

Math Medley
Help build your children’s counting ability while they perform this pose. Graduate to 2s, 3s, etc. When age appropriate, also reinforce their multiplication tables.


Childs Pose

Child's Pose

This pose goes by many names. Sometimes we call it Acorn. Most call it Child’s Pose, because babies often sleep this way.

Begin in Heel Sitting Pose. Open your knees a little, so your belly relaxes between your thighs. Bend at the hips and fold forward, letting your shoulders drop down, away from your ears and spine.

Your arms lay back along the sides of your legs, with open palms facing upward. Please your forehead on the floor, or turn it to one side for a while and then to the other side to gently stretch your neck. Take at least five breaths on each side.

Extended Child’s Pose

This time, lengthen your arms forward in front of you, with palms facing downward. This pose “extends” the spine, shoulders, arms, and fingers. You can stay in either version of Child’s Pose for as long as you want to.

Awesome Anatomy

Can you feel your ribs separating and moving as you breathe? Your intercostal muscles are at work. We call this “breathing into your back.”

Quiet Quests

Imagine a giant zipperfrom your neck to your tailbone. Use your breath to unzip it slowly from top to bottom. As it unzips, feel both sides of your back melt away from your spine. Breathe into your back. Let your back soften from your breath so it feels boneless.

Ecological Echoes

Animals without backbones are called invertebrates. Some examples of invertebrates are worms and jellyfish. This pose could be renamed “Jellyfish Pose”!

Orchestra Yoga Sculpture

This is a great yoga game for groups! Begin with any size six-sided block or dice. Write or draw different poses on each face of a die. You can use a pair of dice for a larger group. You should also have a set of cards, numbered 0 to 10.

Take turns rolling the dice and doing the pose as indicated. As each person takes their turn, they become part of the group-created “yoga sculpture.” This means that every single member needs to be physically connected to someone else in the sculpture. When someone joins the sculpture, they can also make a unique sound, becoming an instrument in a group-created orchestra.

Take turns allowing one person to become the conductor of the orchestra. The conductor points to someone in the sculpture and draws a random card out of the pile. The person chosen recreates their unique sound equal to the number of times on the card shown by the conductor. If the number zero is selected, that indicates a silent moment. Experiment with the tempo of the music and the number of “musicians” playing at the same time. Play around and have fun!

R is for Roar

A lion’s roar serves many purposes: To warn, welcome, attract and scare. With sound, lions use their language to claim territory, attract members of the opposite sex and frighten enemies. Roars can be heard 5 miles away.

R is for Roar PoseInstructions

  1. Sit on your heels and spread your the knees a little bit.
  2. Stretch your fingers into giant lion claws. Place them at the top of the thighs.
  3. Inhale. Puff up your proud lion chest with your breath.
  4. Exhale with a quiet, throaty rrrroar. Stretch your tongue out towards your chin. Open the back of your throat.
  5. Start with 3 quiet ones. Do 3 more ripping roars. Growl, grunt, yawn and purr too.

Remember R is for Roar. RRRRRRRRRoar. L is for Lion. LLLLLLLLion.


Note to Parents and Teachers

This pose opens the throat. It can help remedy bad breath. It is especially helpful in winter months and for colds. It pulls up phlegm, which should be spit out to help clear the body of excess mucus,


Activity Ideas for Home and Classroom

Ecological Echoes
Both boy and girl lions share the responsibilities in defending territory, hunting and raising their cubs. With their relatives, the females live in groups called prides on land that has been handed down from one generation to the next. Males form “coalitions” and try to infiltrate prides to find their brides…

Musical Musings
There are 3 different types of roars that make up the lion’s song. The prelude or beginning is generally soft, low moaning sounds. Then, it rises into a high-energy “roar” that generally goes from high to low and ends with “aaoouuu.” The finale is very staccato (short and quick) with grunts that sound like “huh, huh, huh.” *

Laughing Language
We have learned lions have many different sounds in their language.

  • A is for aaoouuuu
  • G is for grunt and growl
  • H is for huh
  • P is for Purr
  • R is for Roar
  • Y is for Yawn

Go through the alphabet. Can you find a sound for each letter? They might not be in lion language, but that’s OK.


November: Mandala Coloring Page

To color:

  • Click on the image to open it in full size.
  • Right click (or command click on mac) and save picture to your computer, and
  • Use Paint or a similar program to color on your computer, or
  • Print the picture and color it with crayons, paint, glitter…whatever!

GRATITUDE FRAME

This month, to put a little extra practice into your ATTITUDE OF GRATITUDE, print your mandala and use it as a frame (or color it digitally in a program like Paint).

In the center, draw the person or thing you’re most grateful for!

HAPPY THANKSGIVING from YogaKids to all our Bendy Buddies around the world! 

We would love to see what you make with your gratitude frame. Have your parents email us photos or JPG images of your gratitude mandala. 🙂


Scented Bath Salt Gift Jar

Photo from travelblog.com
Photo credit 

Hey! Check out this guy, floating in a super-salty sea while reading his newspaper! How does he do it? Is he a superhero, or is the water magical?

Today we’re going to make a really easy, fun gift for our friends and family, and we’re going to learn how epsom salts can make your bathtub more like The Dead Sea, the density difference between gold and kitchen sponges, and learn a little about the super amazing body armor you wear every single day.


SCENTED SALTS GIFT JAR

This is a very easy and inexpensive gift you can make for friends and family. 

You’ll need:

  • 1 cup Epsom Salts
  • 1 cup Kosher or flaky sea salt
  • 1/4 cup baking soda
  • 10-20 drops essential oil(s)
  • A container with a tight lid
  • A bowl and a fork or whisk

Optional ingredients

  • 4-6 drops food coloring
  • 1 Tablespoon dried flower blossoms, like lavender, chamomile, rose
  • sticky labels, fabric, ribbon for labeling and decorating jar
  • optional: used for fizzy salts – 1/4 cup citric acid

Instructions

Mix the salts and baking soda together in a bowl. Add 10-20 drops of essential oil, dried flowers, food coloring and keep mixing until everything is evenly mixed. If you’re making a fizzy bath salt mix, add the citric acid when you’re absolutely sure all the other ingredients are soaked into the epsom salts. No clumps should remain. Now add the salts to your container, and either use labels or a fabric circle tied around the top with a tag. On the tag, write something like “To: Mom, From: Your Favorite Kid – Lavender Mint Bath Salts.

Make the jar look pretty, and give it as a gift!

What do bath salts do?

There are lots and lots of myths about what Epsom salts can do, so let’s start with the one thing we absolutely know to be true: when you put this mixture of salts into warm water,  your bathwater will increase in density because of the salts. This increase in density makes water feel silky, thick, heavy, luxurious…and especially when mixed with nice scents, this may make you feel more relaxed. It will also make you feel lighter — because your density remains the same, while the density of the water increases, making you float more easily.

What is density? Density is how much mass a substance has, compared to how much space it takes up.

Imagine this:

These two blocks take up the same amount of space. One is made of solid gold. The other is made of kitchen sponges. Which one weighs more?

The block that weighs the most is made of solid gold, even though it’s the same size as the sponge block. That means the density of gold is higher than that of sponge. If you look very closely at a block of gold, you will see there are no air pockets; just a solid piece of metal. If you look at a sponge, you see air pockets inside. The air pockets take up some of that space, but add no weight – just air. That’s how density works.

So why do you feel lighter in a bath filled with bath salts?

Have you ever heard of the Dead Sea or The Great Salt Lake? The first one is an inland sea that borders the countries of Isreal, Jordan, and Palestine; the second is a giant lake in the state of Utah, in America. What they have in common is that they are very VERY salty. The huge amount of salt dissolved in the water makes the water a lot more dense.

Your body is just a little less dense than water, meaning you will float in water.

  • When water is very salty, it becomes even more dense than you, so you float even better more.
  • If you have a lot of body fat, your body will be less dense, making you more buoyant (meaning “floaty”)
  • Epsom salts increase the density of the water, which in turn adds to your buoyancy. This floating sensation may help you relax your muscles more readily.

Body Stuff

This is a good time to talk about your body and how it cleans itself, something it is naturally very good at doing. There are several organs and systems that allow keep your body clean, from the inside out.

The digestive system includes the intestines, salivary (spit) glands, pancreas, stomach, and gall bladder.

The liver detoxifies the blood, and produces some of the biochemicals necessary for digestion, which is the way your body breaks down foods and uses their nutrients to run the magnificent machine that is your body. It filters your blood and produces special enzymes to destroy toxins we might get from food, water, and air. The liver basically packages up these things our body doesn’t want or need, so the body can get rid of them through your urine and bile. Liver is in charge of metabolism, a chemical process in which foods are converted into energy the body can use.

Food also passes through your intestines, where nutrients are absorbed. Healthy intestines keep good and bad bacteria in balance, so your body can digest (use) the food you eat.

Kidneys are part of the urinary system. They also filter your blood to remove waste, and send it to the urinary bladder. The kidneys get rid of waste products like urea and ammonium, which leave your body as urine. eir principal function is to transport oxygen from the atmosphere into the bloodstream, and to release carbon dioxide from the bloodstream into the atmosphere.

Lymph is the clear fluid that makes up part of our lymphatic system, which is part of the immune system. Lymph contains white blood cells (the body’s warriors!), which pick up bacteria and viruses from your cells and carry them back to your lymph nodes, where they are destroyed.

And finally, your SKIN helps fend off infection and absorption of unwanted toxins because it is basically a giant, flexible suit of armor that stands between your inner systems and the world. Skin can also excrete extra salts your body doesn’t need by sweating. Your skin is part of the immune system, but the top layer of skin is actually dead. That dead part of your skin is constantly falling off and being replaced by new skin cells. It is part of the integumenty system – the entire network of dead skin cells, from your skin to your nails and hair, that create a final barrier between your body and the outside world. Did you know you you lose 40,000 dead skin cells every minute!?

Your body sure does work hard to keep you clean! By eating nutritious, healthful foods and having good hygiene – like taking baths and brushing your teeth – you help all the systems of your body do the best job they can to keep you healthy and keep your amazing machine running smoothly.


More on the science of Epsom salts.


Vegan Pumpkin Soup

Vegan Pumpkin SoupYou’ll need a cookie sheet, a food processor or immersion blender (OR a good hand-masher and some patience), a soup pot, and an oven for this soup. You’ll also need an adult to help with cutting, baking, and cooking on the stove top!

Ingredients

  • 2 cups veggie stock
  • 2 pie pumpkins (2lb or less each)
  • 2 Tablespoons olive oil
  • 2 Tablespoons curry powder (you can substitute half or all curry powder with Seven Spice powder – I do half and half)
  • 1 bunch scallions
  • 1 cup coconut milk + 2T for garnish
  • Salt to taste
  • Roasted pumpkin seeds
  • Chopped parsley garnish optional

Preheat your oven to 350F.

Cut the tops off the pie pumpkins and scoop out the seeds and strings. Try not to scoop out solid flesh. Roast the pumpkins (top included) for 45 minutes. Remove and let cool, then carefully scoop soft meat out of pumpkin, taking care not to puncture the skin if you want to use the pumpkin as a bowl.

Add chopped scallions, spices, and olive oil to a saucepan or cooking pot and stir over medium heat until spices are fragrant, then add vegetable stock and ½ of the pumpkin flesh (all the flesh from one pumpkin).

Bring to a boil, then turn heat off. Allow to cool a little, then use immersion blender to puree. If you’re using a food processor, you need to let it cool down a lot before pureeing. You can also use a potato masher to squash all the squash, if you want your soup chunkier and more stew-like.

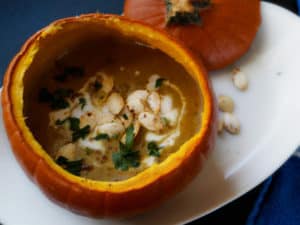
Add the rest of the pumpkin (cut into bite sized pieces), bring the soup to a boil again, turn down to simmer for 5 minutes, turn off heat, add coconut milk. Garnish with parsley, roasted pumpkin seeds, and a dollop of coconut milk.

To make the pumpkin seeds: Take all the pumpkin meat and gooey strings away until the seeds are mostly clean. Put them in a colander and run water over them, stirring them with your hands until all the pumpkin flesh is rinsed away. Pat them with a paper towel and spread them out on a cookie sheet to dry completely, then toss in a little olive oil (about 1 Tablespoon) and season with 1 teaspoon salt and your choice of other seasonings. I like to use spicy seasoning, like smoked paprika and Aleppo hot chili, but you can use whatever you like! Spread the seeds out again on the cookie sheet so they are in a single layer, and bake at 250F while you’re making the soup. Bake until seeds start to turn golden and are as crispy as you want them.

This recipe sounds like a lot of work, but it’s actually very easy. It’s a good teamwork exercise and looks fancy-pantsy for the holidays! If you’re not in a curry mood or don’t like spicy food, you could use nutmeg, sage, or other fragrant spices to season your soup.

While I was making this soup, I also cut my white fairtytale pumpkin (also called Ghost or Lumina) into slices and roasted it, too, so I can puree the roasted quash in a food processor and use it for my holiday breads and pies. Look at this beautiful pumpkin: white on the outside and pretty orange on the outside!


Squash is Awesome

Squash is used mostly by cooks as a vegetable because it goes well with savory spices – meaning, flavors that make up salty or spicy dishes, instead of sweet dishes. If you’ve ever had pumpkin pie or zucchini bread, you will know how sweet and tasty squash can be as a dessert, too! It is classified as a fruit because the seeds are inside. Vegetables are all the other parts of the plant, like stems, roots, and leaves.

Squashes include winter and summer squash, and gourds. Did you know that all the parts of the squash plant are edible? That’s awesome! Tender shoots and leaves can be cooked into soups and stir fry dishes, as well as the blossoms (which are delicious battered and deep fried, or tossed in a little oil and seasoning and pan fried).

Summer squash types include zucchini, yellow (or summer) squash, and pattypan squash. These types of squash have a very thin skin and don’t last for more than a week or so after you’ve removed them from the vine.

Winter squash types include pumpkin, butternut squash, Delicata squash, and lots more. You can tell a winter squash from a summer squash because winter squash has a very thick, tough, inedible rind (or shell) on the outside. Decorative gourds fall into this group, though they are not always edible – some calabash varieties are poisonous in high concentrations (meaning, if you eat a large amount). While you can technically eat most of the decorative gourds you see in the grocery store, their flesh is very bitter, so we usually use them for fall decorations or crafts that involve allowing the middle of the gourd to dry out and using the hollow shell for anything from shakers (like a maraca), to birdhouses, to bowls and carrying baskets. With gourds and many other plants, that bitter taste is often nature’s way of saying, “you should avoid eating me.”

The word “squash” comes from the Massachuset (a tribe of people indigenous to North America) word askutasquash. Most squash originated in South and Central America, where it was then spread by human and animal migration to other continents, including North America. Calabash gourds, which are sometimes hollow, originated in Africa, and scientists believe they spread not only through migration, but also by hollow gourds full of seeds floating across the ocean. That is a long journey! If you look on a map and find East Africa, then find your house, how many miles would a gourd have to travel to get from its original home to you?

Summer squash grow all summer long and are plucked from their vines as they ripen through the whole summer. Winter squash also grow in the spring and summer seasons, but the biggest harvest comes in the fall. The reason they are called winter squash is because their rinds are so durable that, if they are not damaged or punctured, you can keep them all winter long! Squash become more bitter the longer they sit, though, so if you’re cooking with them you’ll want to do it soon after you buy or harvest them.

I used folded note cards to label the winter squash I have — but not just because I needed something to write on. If you’re cooking with winter squash and want to save seeds for your garden, you can label them, use tape to enclose the dried seeds in the paper, and store them in a cool (not freezing) place until you’re ready to plant them. If you have a patch of dirt or a nice big pot that isn’t occupied, try growing some of these yourself, and experiment with all the fun and tastiness squash has to offer!