Help Children Experience More Joy with Lemon Toes

Lemon Toes pose

Progressive muscle relaxation (PMR) was developed by Dr. Edmund Jacobson, and is a technique in tensing and relaxing the muscles. This technique leads to an increase in relaxation throughout the entire body, essentially, physical tension melts, which in turn relaxes the mind and emotions. YogaKids creator Marsha Wenig developed the Lemon Toes technique to take a very adult practice and make it kid-friendly. In this version of PMR, children imagine their toes are straws, sipping sour lemonade up from their toes to every part of the body. Children sip, pucker, breath and relax.

Cultivate Contentment

Santosha is one of the niyamas, yoga’s observances, and it means contentment. Life can be very challenging, and Lemon Toes helps kids understand that pain comes and goes. Children develop tools to cultivate contentment even in challenging times. In Lemon Toes, we experience the sensation of constriction, tightening and compression in the entire body, followed by a feeling of ease. This can be very comforting to children as they begin to trust that pain in life is inevitable, but suffering is not. Living a joyous life is less about avoiding challenges, and more about how we deal with and think about life’s challenges. Lemon Toes helps kids experience tension and realize that they are still OK. It gives them trust in the universe.

Author and happiness expert Shawn Achor says that only 10% of happiness is based on our external world meaning where we live, what fun “stuff” we have, the weather etc… 90% is based on how our brain processes what happens to us. We could be sitting on a beach in Hawaii sipping a fruit drink while someone rubs our feet and still be miserable — or we could be walking in Chicago on a cold dark windy April morning and experience much joy. Lemon Toes helps kids process discomfort as a natural part of life, and helps them to experience less fear and anxiety around discomfort.

Welcome Opposites

When we experience pain, it is important to also find the opposite of that — or ease. Dr. Deepak Chopra spent time in a monastery in India, and part of their practice was to go out into the streets barefoot and beg for their food. Deepak told his teacher that walking barefoot was extremely painful and his teacher told him to focus on the foot that is in the air. In Lemon Toes, kids experience constriction and then the opposite of that, extreme ease. The ease is much sweeter after the constriction than before. Children are able to notice their being more easily and the practice is very mindful. Welcoming the opposite of sensation improves focus and concentration.

Body Sensing

Mindfulness refers to staying in the present moment; it leads to a deeper sense of peace. When we shut of the mind’s constant stream of thoughts (many of which are negative), we tap into that place in ourselves that is full of peace. Body sensing is a mindfulness technique used to draw focus inward. We can’t sense the body and think at the same time so thoughts begin to melt away. Lemon Toes draws the attention inward, and children improve focus, concentration and reduce stress.

Practice

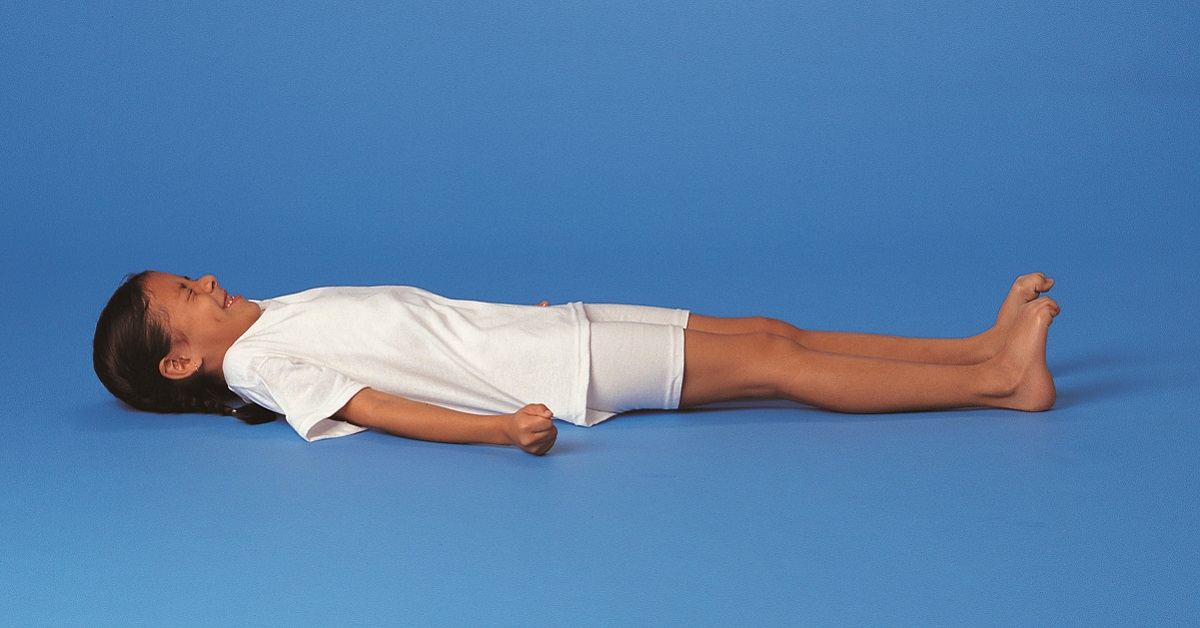
Lie on your back. Imagine that your toes are straws, sipping sour lemonade up from the bottom to every part of your body. Hold your breath as your toes curl and pucker. Breathe out as you relax your toes. Work your way up your legs, belly, chest, and arms, sipping, puckering, breathing and relaxing. Make a sourpuss face. Tighten up your nose, eyes, cheeks, teeth and forehead. Let our hair curl. Hold it, squeeze it tense it. Release. Finally, tighten your whole body at once. Hold it for 5-10 seconds. Completely release, relax. Feel the difference between sour, tight and ten


Learn ALL the YogaKids poses and their benefits as a Certified YogaKids Teacher!


Teaching English Language Learners

Little girl playing with blocks at home

Yoga benefits our students physically, mentally, and emotionally, but yoga for learning language? Let’s explore how yoga promotes language acquisition in English Learners.

English Learners (ELs) are people whose native language is one other than English. They are learning the culture of a new country, academic language in school, and social language for daily interaction. Sometimes young ELs live with the added stress and responsibility of interpretation for family members in a variety of business and medical settings.

We know practicing yoga can aid with relaxation, self-regulation, and self-awareness. In addition, yoga can be a great resource providing further experiences with expressive and receptive language. Yoga offers mental and emotional release in the midst of a long day, where ELs are constantly trying to make sense of the language and routines around them. Using minimal verbal cues, children can participate in breath and movement.

Total Physical Response, TPR, is a well-known language teaching method coordinating language and movement. YogaKids exemplifies the Total Physical Response, combining language with physical movement and modeling. Think of how often yoga instruction includes direction and position vocabulary such as up, down, left, right, in front, behind, around, etc.  Body parts of humans and animals is another category of terms used throughout YogaKids instruction.  These are just a few Laughing Language activities that are perfect for ELs.

Participation in yoga class also offers ELs a fun way to engage with peers. YogaKids provides children the opportunity to participate in large and small group partnerships. ELs can take a turn as pose leader, promoting oral language development, even if they know very little English. As YogaKids Teachers we provide a safe environment in which to experiment with language.

Listed below are a few ideas to support English Learners in your YogaKids class:

  • Modeling is key. (You are an actor in a silent movie.)
  • Visuals, like pose cards, are helpful. After introducing a sequence, students can use the pose cards to retell the pose story or create their own.
  • Speak slower, not louder.
  • Repetition; remember multiple exposures are needed to internalize a new concept.
  • Simplify language; use precise terms with paraphrasing.
  • Position EL near socially positive peer.
  • Choral responses provide a safe way to participate orally.
  • Allow children to simply observe (safety of choice as they learn receptively).
  • Offer ways to demonstrate that do not require speaking. “Show me…”
  • Provide options for student responses, i.e. “Mountain or tree?” (Model as you say the options.)
  • If you have your own space, label the room. (window, blankets, blocks, water, wall, etc.)  This is helpful for ELs with strong oral language but limited written skills.
  • Implement music. It teaches the rhythm of language, and culture.

Remember facial expressions and body language can be easier to understand than words.  So let your light and love of children shine!


Learn how YogaKids can help you teach children of all ages and abilities!

Spring Is in the Air (a free YogaKids class plan!)

butterflies and flowers

What better way to celebrate the spring season than with a fun-filled YogaKids spring-themed lesson plan? Perfect to use in the home, studio or classroom, this FREE class plan includes a spring craft, a We All Win yoga game, an original yoga flow, poses perfect for the season, and much more!

MATERIALS

  • name tags
  • crayons
  • sharpies
  • coloring pages
  • ping pong balls
  • straws


CONNECTING CIRCLE

Spring is March 20 to June 21. When it’s spring in the northern hemisphere, it’s fall in the southern hemisphere (Australia). Share fun facts about spring as you do the following poses together:

  • Reach for the SunWe are closer to the sun in the spring.

Begin in Open Mountain pose. Breathe in and reach up high with an outstretched hand. Grab a piece of sunshine and pull the power into your solar plexus, your inner sun. Exhale with a “HAH” breath. Repeat with the other arm. Alternately reach with the left and right arms. As you practice, increase the force of your breath.

  • Moo and Meow  – Many animals have babies in the spring.

Begin in All Fours Pose. Line up your wrists under your shoulders. Spread your fingers wide and arch your spine to the sky. Loosen your neck and drop your head down. Breathe out long as you meow. Now lift your chest forward and look up with big cow eyes. Dip your belly down and tilt your sitting bones up. Your back will sink down like a cow’s. Make cow lips and moo deeply from the back of your throat. Go back and forth, meowing and mooing.

  • Polar BearAnimals such as bears who hibernate start to wake up and become active.

Begin in Heel-Sitting pose. Open your knees wide apart, toes touching behind you. Bend forward at the hips and slide your chest along the floor. Place your chin on the floor and put your paws over your nose to keep yourself warm. Breathe in and out.

  • Finger-Dancing/Salutations to MeDuring April, you will see more rain showers.

Sit on your heels or cross-legged. Begin at the top of your head and gently stimulate your hair and skin by lightly dancing your fingers all the way down your body. Allow the self-touch to feel good, as it wakes you up, stimulates your skin and lymph system and makes you feel alive. Do this technique along with Salutations to Me. Each time you touch a part of your body say a silent affirmation or kind statement to that place: toes; skull, hair, face, ears, neck, throat, chest, breasts, belly, bottom, legs, arms, feet, etc.

  • Circle of Friendship FlowersMay the flowers will start to bloom.

Kneel in a circle, holding hands. As you inhale, reach your arms up, lift your buttocks off your heels, and stretch back arching your back and neck. As you exhale, continue to hold hands and fold down into Child’s Pose. Repeat a few times imagining all the different flowers that you could be.


POSES AS PATHWAYS

Do a Planting Seeds Yoga Flow together!

  • Mountain Stretch your arms up overhead and say “hello” to the sun and pluck some “seeds.”
  • Ragdoll Dig a little hole and plant the seeds.
  • Standing Half Forward BendLift halfway and pretend to pour water on the planted seeds.
  • Ragdoll Pat down the dirt around the planted seeds a bit more.
  • MountainClasp hands overhead, making a “sun” with raised arms.
  • Repeat the previous poses one time.
  • Low SquatIt’s time to see if anything has sprouted! Squat down low. I see something!
  • Mountain
  • TreePlace one leg on the shin and grow your branches up. What kind of tree are you?
  • Repeat the transition from “squat” to “tree” on the other side.

Celebrate springtime activities with the following poses:

  • Kite

Begin in Mountain pose. Come onto your tippy toes and stretch your arms up and out to the side like tree arms. Lean to one side and stretch a leg out to the other side. Change sides. Play with your balance as you find your way and move with the wind. Feel your body flying like a kite.

  • Wind Chimes

Stand with your feet a little wider than hip-distance apart. Swing your arms back and forth in harmony with your breath. Be sure to keep your feet planted. You are a wind chime moving with the wind. Now separate your feet into a wide stance. Bend forward and take your right hand to your left leg. Lift your left arm to the sky and look up. Now lower your left arm and take it to the right leg. Twist your torso towards the sky and look up. Go back and forth several times.

  • Roller Coaster – Amusement parks are open in the spring, and many towns host festivals!

Sit down in a line with your legs spread wide. Clasp your hands around the person in front of you. As the roller coaster climbs up the hill, lean back. Then lean forward as you speed downhill. Be brave and raise your hands as you lean from side to side

  • Butterfly with Antenae

Begin in L-Sitting pose. Bring the bottoms of your feet together, with your heels close to your body and your knees out to each side. Stretch your neck and the top of your head toward the sky and make your spine longer. Place your hands at the sides of your head and stick up your pointer fingers to make antennae. Pull your arms back like they’re your wings. Breathe in and out as you flap your wings forward and back, up and down.

  • Bridge – Some people take trips in the spring to visit family!

Lie on your back with your arms by your sides. Place your feet hip-width apart as close to the sit bones as possible. Press your feet into the ground and lift your hips to the sky. Place your hands however it’s comfortable to support your lower back and pelvis. Lift your chest and arch your spine.


WE ALL WIN

Play Ping Pong Ball Breathing. Give each child a straw. Blow a ping-pong ball around the circle by blowing.


VISUAL VIGNETTES

Print or draw flowers with 4-8 petals and have the students color in the flowers with a light color crayon, then write something they love about themselves on each petal.


QUIET QUESTS

The Cherry Blossoms – “My friend Rengetsu was returning from a pilgrimage when she stopped in a town to rest for the night. Although she appeared tired and hungry, each door she knocked on refused her lodging. As the sun began to set behind the hills, she hiked up to a cherry orchard on the hillside. There she made a little bed of leaves under the trees and fell asleep. But something stirred her in the middle of the night. A beautiful scent fell over her. Pulling herself up from the sleep, she saw the loveliest of sights, the black sky behind dozens of trees with pink cherry blossoms, all blooming radiant and shimmering in the moonlight. Rengetsu took in the beautiful experience. Then she turned toward the town, gave a little bow, and said, ‘Oh people of the village, thank you so much for turning me away tonight, for if you did receive me, and give me a place to rest in your home, then I would never have been able to witness such beauty!’” Imagine you are lying in the cherry blossom.


CLOSING CIRCLE

  • Fountain of Oms

Everyone chants OM at their own pace and rhythm. Start together, but everyone’s duration can be different. Let the OMs keep coming at various intervals; some short, some long. Feel the Fountain of OMs wash through and around you. The sound and vibration is very powerful. Keep your eyes closed and keep chanting. Keep the OMs flowing and allow the sound to cease with its own natural conclusion.

  • Namaste

Put your hands together at your heart and bow to each other.


Learn to write and teach your own YogaKids lesson plans!

Yoga Tools for Temper Tantrums

child screaming

When my son was 3, he was diagnosed with a dairy allergy. Not long after the diagnosis he had a meltdown over a Sponge Bob ice cream cone at a local zoo. Despite my efforts to entice him into a non-dairy treat, he insisted on the ice cream, and as the discussion continued, we both became more and more agitated. Eventually the incident ended in a full out screaming fit with my son lying down on his back and kicking his feet, while making balls out of his little fists. As a small crowd of people watched, I tried desperately to calm him down, eventually getting so angry myself that I picked him up and dragged him back to the car literally kicking and screaming.

Most parents of toddlers can relate to this story. Shortly after the zoo incident, I started yoga teacher training with YogaKids. In the ,training I learned many techniques to calm the body and the mind. I soon began to incorporate what I learned with my own children and it led to a harmonious journey into peaceful parenting the YogaKids way.


Take Steps to Prevent Tantrums

Setting clear boundaries, offering rewards for good behavior, and staying away from triggers will help to prevent tantrums. My son’s ice cream meltdown could have been prevented if I had steered clear of the ice cream stand in the first place. It would have also helped if, as a family, we avoided ice cream when together. Finding special non-dairy treats that my son liked and having those at-the-ready would also be a helpful tool to promote peace and happiness.


Stay Calm

During a temper tantrum, it is very easy to get angry and frustrated yourself, but this will only fuel the situation. If you stop and observe how you feel during the tantrum, you may find an inner calm present behind the stress that eases the tension in the situation. If you find calm, that energy will help to calm your child. Your child will come to understand that they can trust you to be peaceful and calm no matter what, and will find this comforting. Observing your breath is a great tool to focus on while the tantrum is happening. Once your child has calmed down, speak softly with kindness and empathy. Let your child know you understand why they were frustrated, and practice peaceful breathing or a mindfulness technique after the tantrum is over. This will build your child’s “peace muscle,” your child’s ability to tap into that part of them that is full of ease and joy.


Tantrums Can Help Your Children Get Their Feelings Out

As long as your child is safe, tantrums can help them to release frustrations. Small children often have a hard time articulating how they feel, and they may not have developed coping skills to handle life’s everyday stressors.  It is very healthy to release tension instead of keeping negative thoughts in. Crying, jumping up and down, or lying down and kicking can help to release tension. If we don’t express frustrations often, they lay dormant and can block positive energy and affect our ability to enjoy life.


YogaKids Tools for Temper Tantrums

YogaKids offers many tools to help kids release excess energy, move their bodies in healthy ways, and calm down and find peace.

Volcano – This pose offers a healthy outlet for tension.

Begin in Mountain pose; bring the fingertips together at the chest. Jump the feet apart. Place your palms together at the center of your body. Breathe in. Watch your hands as you raise them over head. Breathe out as you explode your arms outward. Lower them to your sides and return your hands to heart. Erupt and release again and again. Make big, exploding volcano noises.

Rocket Ship is another healthy way to blow off steam in a fun way.

Begin from a Squat, inhale and shoot your hands and body upward to the sky and make blast off noises. Come back down and do it a few more times.         

Peace Breath – Once stored energy has been released, Peace Breath is a great way to calm the nervous system.

Close your eyes. Relax your face muscles. Let your skin drape over your bones like a soft blanket. Breathe in. Breathe out and whisper the word “peace.” Repeat 3 to 6 times

Swim Ducky Swim is a technique that can be used at the end of a yoga practice, at bedtime or anytime you have 5-10 minutes to calm down and help to increase focus.

Lie down on your back. Place a rubber ducky on your belly. Breathe gently in (your belly button rises) and out (your belly button sinks down.) As your belly rises and falls like the waves, your ducky surfs the waves as you inhale (breathe in) and floats as you exhale (breathe out). Give your ducky a slow and gentle ride with your breathing. You can used any small stuffed animal or favorite toy for this exercise.


Learn ALL the YogaKids poses and their benefits as a Certified YogaKids Teacher!

Facing Fear and Anxiety with Challenge Poses

child in crow pose

At a small amusement park along the Jersey shore, waiting with my kids for a turn on the ride, my eyes and ears were drawn to one particular child. High excitement could be felt from the kids in line anticipating glimpses of the ocean, onlookers, and sand sailing by as the ride whirled around. Kids already on the ride were happily screaming and yelling, at times waving to family and friends, their eyes wide with seeing a blur of blue ocean and sky.

Except for one child. One little girl, crying uncontrollably as the ride increased its speed and circular motion. Unprepared for the motion and sensations, her whole being shouted “stop the ride, I want to get off!”

Like the response expressed by the little girl on the ride, trying new things can leave one feeling under prepared, overwhelmed, and over faced. Teens especially, already grappling with physical and emotional changes, may find trying new experiences daunting while trying to navigate their ever-evolving inner and outer worlds. Awkwardness and shyness can prevent them from trying anything different or novel. They don’t want to appear silly, inept, or clumsy in front of their peers!

Trying new asanas can produce anxiety in a student who feels it is beyond their ability. It gets even worse if they feel they are the only one in class who cannot do the pose! This is a great learning opportunity! An idea to address these concerns is to incorporate “Challenge Poses”.

First, provide and maintain a safe and supportive learning environment. Suggest that awareness of the breath is a great aid for the students to gauge their response. Then have the students pick a pose (example: Camel, Crow, or any pose your students find challenging and out of their comfort zone). The students can choose individual poses or all work on the same one as a group.

Example: Dromedary Delight (aka Camel pose)

Instructions: Kneel on the floor with your legs and knees hip-width apart. Curl your toes, push your thighs forward, and bring your hands to your lower back. Lift your chest. Breathe evenly in and out as you extend your rib cage and broaden your chest. Continue to lift your chest with each breath as you bring your hands to your heels. Increase the duration and repetitions of the pose as your spine and chest become more flexible. Rest in Child’s Pose after each back-bend.

You can take the pose “apart” by doing it in stages:

  • Beginner  (just touching backs of legs)
  • Intermediate (feet flexed, touch heels)
  • Advanced (feet flat, touch heels)

Have the students decide how far to go and how long to stay in the pose (defining edges). Explore adding props (the hands rest on two blocks next to the heels rather than heel touch). This modification makes the pose more accessible.

Here are a few more challenging YogaKids poses. Think about how they can be broken down into stages.

Wheel: Lie on your back. Bend your knees and place your feet flat on the floor, with your heels as close to your sitting bones as possible. Raise your arms up over your head and bend your elbows. Place your palms flat on the floor beside your ears with the fingertips pointing toward your shoulders. Pull your elbows toward each other. Press down into your hands and feet, as you straighten your arms and legs. Your chest and thighs lift toward the sky. Imagine a wheel underneath you, supporting the spine in this convex shape.

Headstand: Lace your fingers together and place your forearms on the floor. Set the crown of your head on the floor, placing the back of your head in your interlaced hands. Inhale and lift your knees off the floor, slowly walking your feet closer to your elbows. Exhale and lift your feet off the floor, pulling your knees to your chest. With a firm upper body and abdomen, extend your legs skyward. To come out of Headstand pose, draw your knees into your chest and bring your toes to the floor. Walk your feet away from your elbows and gently drop your knees to the floor. Rest in Child’s Pose.

Crow: Begin in Mountain pose. Bend your knees and squat down. Place your arms to the inside of your bent legs and press your hands with outstretched fingers into the floor. Lean slightly forward. Bend your elbows to make a shelf for your knees. Lean forward and balance with your feet off the floor. With patience and practice, you can increase the time you can stay balanced.

Whenever working on challenging poses, be sure to give time for exploration. Allow for feedback of the experience. Ask questions; what was felt prior to trying this pose? Was it a positive attitude; I will do this! Or a negative attitude; this is impossible! No way! Discuss feelings around the process. Did they feel self-criticism? Were there feelings of accomplishment, happiness, frustration, or discouragement? New experiences can test our edges, whirling us way out of our comfort zone. But it also opens us up to new possibilities and a great opportunity for growth.


Learn ALL the YogaKids poses and their benefits as a Certified YogaKids Teacher!

Helping Kids Choose Happiness

children in pedal laughing pose

I recently saw an interview on TV of a new mom with her baby. The reporter asked her what she wanted for her child.  “I just want her to be happy,” replied the mom, an answer that probably most of us would give. As new parents we give our baby their basic needs to satisfy their happiness. As toddlers, we find that instant gratification in the form of a toy or treat works to bring happiness.

There comes a time when a child can learn that happiness comes from within. Our feelings are never wrong; we just need to learn how to understand and cope with our emotions. As parents, teachers, and child advocates we can help kids choose happiness over unhappiness.

We can foster happiness by displaying positive emotions like empathy and gratitude. Surround the child with people who lift her up rather than bring her down. We can also reflect on our own attitude towards happiness. In yoga, we practice Santosha, or contentment. Would a bigger house or new vehicle truly make us happy?  If we often complain about material possessions, then the child will associate that with attaining happiness.

It is also valuable for a child to understand that being sad is okay too. The loss of a pet or a friend moving away will make us sad, and sometimes only time can help.

I feel so blessed to have YogaKids in my home and community to help nurture happiness within. When I teach a class, my intention is always to have the student leave feeling happier than they did prior to class. When I notice that a child in my YogaKids may be grumpy, here are some poses I incorporate:

 Volcano: This pose safely releases emotions. Fill your volcano with something you love!

Begin in Mountain pose. Bring your fingertips together at the chest. Jump your feet apart. Place your palms together at the center of your body in Namaste Position. Breathe in. Watch your hands as you raise them over your head. Breathe out as you explode your arms outward. Lower them to your sides and return your hands to Namaste. Erupt and release again and again. Make big, exploding volcano noises. Jump your feet back together when you’ve finished erupting.

 Untie the Knots: This pose loosens up your whole body to relax, shake, and feel great!

While standing, untie your neck by rolling your head around. Untie your shoulders by moving your shoulders up, down and all around. Untie all your knotted muscles and joints from head to toe. Massage and stroke them after you’ve untied them. Untie them until you feel nice and loose.

Tarzan’s Thymus Tap: This is a great pick-me-up for tired or cranky kids. The taps promote blood flow to the brain.

Start in any of the base poses, seated or standing. Make two fists and pound your chest. Pound and tap under your arms, too. Howl, yowl and yodel. Feel the power and vibration of your sounds.

Peace Breath: Send peace to all the parts of your body, especially your heart.

Close your eyes. Relax your face muscles. Let your skin drape over your bones like a soft blanket. Breathe in. Breathe out and whisper the word “peace.” Repeat. As you say the word, feel the peace inside you. Send peace to the animals, trees and plants. Send peace to your family and friends. Send peace to countries in the world that are at war. Send peace to all the people you love.

Pedal Laughing: Laughter can be the best medicine! If you fake laugh long enough, it will eventually turn into a real laugh!

Lie on your back. Bend your arms and legs like you’re riding a bicycle in the air. Pedal forward and laugh. Pedal backward and laugh. It might be hard to really laugh at first, but once you get started, you won’t be able to stop. Have fun and be silly with this one. Form a pedal laughing chorus. High-tone laughters are sopranos and lower ones are bass. Medium-low laughters are toners and medium-high are altos. Make music with your laughter!

In YogaKids classes we often incorporate books and music.  I love a book called The Feel Good Book by Todd Parr. It’s perfect for ages 4-7, but I find older kids enjoy it too. Of course, the popular song “Happy” by Pharrell is fun and sends a positive message too!

After Savasana, the time of relaxation and renewal at the end of yoga class, I love to incorporate quotes. A favorite of mine is from Dr. Seuss in his book Oh the Places You’ll Go!

“You have brains in your head
You have feet in your shoes
You can steer yourself
any direction you choose
Choose happiness!


Learn ALL the YogaKids poses and their benefits as a Certified YogaKids Teacher!

Open Your Heart

Child in Bubble Fish pose

Our fourth chakra is the heart chakra. A healthy heart chakra is defined by one’s ability to experience compassion, love, generosity, and kindness. Help kids open up their heart chakras with these YogaKids poses!

Bubble Fish: Lie on your back with your arms at your sides. Bring the bottoms of your feet together and open your knees outward. Press your feet together and flop your legs up and down. Slide your hands, palms down, underneath your backside. Squeeze your shoulders together. Arch your back as your chest lifts off the floor. Place the top of your head on the floor. Feel your gills open and close as you breathe. Make fish lips and blow bubbles. Imagine you have gills instead of lungs.

Wheel: Lie on your back. Bend your knees and place your feet flat on the floor, with your heels as close to your sitting bones as possible. Raise your arms up over your head and bend your elbows. Place your palms flat on the floor beside your ears with the fingertips pointing toward your shoulders. Pull your elbows toward each other. Press down into your hands and feet, as you straighten your arms and legs. Your chest and thighs lift toward the sky. Imagine a wheel underneath you, supporting the spine in this convex shape.

Dromedary Delight: Kneel on the floor with your legs and knees hip-width apart. Curl your toes, push your thighs forward, and bring your hands to your lower back. Lift your chest. Breathe evenly in and out as you extend your rib cage and broaden your chest. Continue to lift your chest with each breath as you bring your hands to your heels. Increase the duration and repetitions of the pose as your spine and chest become more flexible. Rest in Child’s Pose after each backbend.

Rocking Horse: Lie on your belly. Bend your knees and reach back to take hold of your ankles one at a time. Lift and broaden your chest as you squeeze your shoulder blades and inner thighs together. Look forward and bring your feet towards the sky. Notice how the entire back of our body contacts, so that the front of your body can open and lift like a proud horse. Take strong breaths in and out, as you begin to rock. Increase your rocking time with regular practice. Rest in Child’s Pose when you get tired.


Learn ALL the YogaKids poses as a Certified YogaKids Teacher!


We All Win: Rock, Tree, Bridge!

Child in child's pose, children in tree pose and child in bridge pose

This is a great cooperative game to play with friends! Get into a wide circle and have everyone get into alternating poses of Child’s Pose (rock), Tree, and Bridge. Then, one person gets up and goes around the circle stepping over the rock, walking around the tree ,and through or under the bridge.

Move slowly and mindfully so as not to disturb the rocks, trees and bridges. Work together to get through the obstacle course without a tree falling over or a bridge breaking! Everyone gets a turn.

Child’s Pose Instructions: Begin in Heel-Sitting pose. Open your knees a little, so your belly relaxes between your thighs. Bend at the hips and fold forward, letting your shoulders drop down away from your ears and spine. Your arms lie back along the sides of your legs with open palms facing upward. Place your forehead on the floor. Turn your head to one side and take a few breaths. Then, turn to the other and do the same.

Tree Pose Instructions: Begin in Mountain Pose. Lift one foot and press your foot against the inside of your other leg. You can use your hand to place your foot anywhere between your ankle and inner thigh. Avoid the knee joint. As your balance gets stronger, you’ll be able to raise your foot higher up your leg. Bring your hands to your chest, palms together in Namaste position. Then raise your arms up above your head. Stretch them out wide, like the branches of a tree. Separate your fingers. Balance and breathe. Now repeat on the other side.

Bridge Pose Instructions: Lie on your back with your arms by your sides. Place your feet hip-width apart as close to the sit bones as possible. Press your feet into the ground and lift your hips to the sky. Place your hands however it’s comfortable to support your lower back and pelvis. Lift your chest and arch your spine.


Create and teach your own Great Ideas as a Certified YogaKids Teacher!

Courage in Heartbreak: Healing After a Pregnancy Loss

Jua Sandra Nnafie - van Dijk

“You don’t realize how strong you are until being strong is the only option you have.”

Adapted from a quote by Bob Marley

If you are reading this, that means that I found the courage to share the story of my pregnancy loss.

If you are reading this, that means that we are one step closer to sharing and opening up to stories about pregnancy loss.

Thank you for reading.

I am sure that my journey in the YogaKids program has given me the strength to get back up, after I took a big fall into the dark in early November 2018. As part of an assignment in the YK program, reading Judith Hanson Lasater’s book Living your Yoga was what helped me start reliving my own yoga.

When I was almost eleven weeks into my fourth pregnancy (or sixth if you’d count my two earlier miscarriages), my gynecologist gave me the heartbreaking news that I would most likely lose this baby within the next two or three weeks. BOOM! Just like that, I fell from cloud nine all the way into the deepest, darkest black hole I had ever known.

I have a husband who loves me dearly and I have three amazing children. This fourth baby, however, had been a forever wish inside my heart. That wish would now go up in smoke. The three weeks that followed were so confusing. Still pregnant, but not really. My mind and heart were swinging from hope to despair to deep sadness. For the first time in my life as a yogi and a mom, even my own yoga practice couldn’t keep my thoughts calm and collected. I did have over 15 years of yoga experience, but this sudden shift from happiness to sadness was too much to handle.

I felt lost and alone. Honestly, I felt like giving up on trying to feel happy again. I had to keep going for my family though. I had to find a positive vibe somewhere. But where?

Only three people knew about my pregnancy. My husband, my mom, and a friend in school — whom I had told at only 7 weeks pregnant, driven by a gust of pregnancy enthusiasm when I heard she was selling baby stuff. I had been keeping my nausea, fatigue and mood swings hidden from the rest of the world for 11 weeks. I had already been fantasizing about how I was going to break the happy news to my friends and family. Now, I was all of a sudden keeping something else a secret. I was secretly carrying a life that was slowly being “absorbed back into my body.” That’s what my doctor said. It hurt, but I wasn’t showing my pain to anyone. Nobody knew I was pregnant, right? So, no one could know I was having a miscarriage during those long, agonizing three weeks.

It wasn’t until a few weeks into my grieving period that it hit me: we do not tell people we are pregnant, so we do not have to share the sad news if we have a miscarriage. (I think you may have noticed that I put my other two pregnancies that ended in a miscarriage in parentheses. I do count them as pregnancies, but would others do the same?) Why I wonder? Why can we only share happy pregnancy news?

Is it wrong or weird to feel sad about losing someone I never even met?

Well, on November 15 2019, when I lost my pregnancy, all my belief in my own yoga and meditation practice went down the drain. Not a single method could calm me down. I cried so much, so loud and non-stop. I was sadder than I had ever been and nothing could help me to take away this feeling. Not a single moment did I think that my breathing could calm me down. I have lost loved ones before, but never in my life had I experienced this much hurt and pain before. For the first time I really felt heartache, there where my heart lives. It hurts. So much.

There I was, lying in bed, listening to my family living, and trying to hold onto my heart, almost trying to squeeze the hurt out of my heart. What was I to do? How could I ever get back up and running, full of smiles and energy, like I always am?

For no particular reason, I remembered the next YogaKids assignment I needed to complete. It involved reading Judith Hanson’s book. Just like you started reading this post, I started reading her book. And….it turned out to be a step in the right (or should I say ‘light’) direction.

I took the liberty of using the assignment as part of my grieving process. It was as if each chapter in the book touched upon another part of the pain I was feeling. Each chapter seemed to be offering me another way of dealing with all the emotions racing through my heart and all the thoughts twirling in my mind. After each page, I felt that I was reconnecting with myself a little bit more. Baby steps.

Tears ran down my face while reading the book, and writing up my assignment, but I allowed myself to feel the hurt, the anger, the disappointment, the shame. I tell you, I feel a lump in my throat even as I am writing this post. The pain is still there. I have found ways to deal with it, most of the times. I have found a way to start living my yoga again.

Thank you, YogaKids, for offering me a way out of total darkness.

Thanks to all of you for taking the time to read my story.

I feel stronger every time I find myself able to share this experience with others. Even though I do not know you, it feels we are now sharing a heavy load, which makes it a little bit easier to carry.

I would like to finish by suggesting that if you went through a miscarriage yourself, please find people who will listen to your story and who will support you while you are grieving your loss.

Sorry for your loss. Sharing the pain really does help.

Namaste.

With a smile,

Jua


“Courage is what it takes to stand up and speak; courage is also what it takes to sit down and listen.”

Winston Churchill


Learn more about the YogaKids program here.

Presidents’ Day Cookies

president's day cookies

President’s Day is a national holiday celebrated on the third Monday of every February. What better way to honor some of our founding fathers on President’s Day than with a sweet treat in the likenesses of George Washington and Honest Abe? Here’s the super-simple recipe for these creative cookies!

You will need:

  • Sugar cookies (fully cooled)
  • Chocolate bar that’s divided into sections (if you need to cut the chocolate, dip the blade of a sharp knife in hot water for a few seconds so the chocolate doesn’t break)
  • Black gel icing
  • Regular chocolate or vanilla icing (homemade royal icing would work the best, but we just grabbed a tub of cake frosting off the shelf for this project)
  • For small president cookies, use mini-marshmallows (dehydrated, for hot cocoa — you can sometimes find these in shaker canisters in the baking aisle), mini-chocolate chips
  • For large president cookies, use mini-marshmallows, full-sized chocolate chips

Use the icing to attach the hats, chocolate chips, and marshmallows to the cookies, then draw on little faces with the black icing. You may need to let the icing set for about half an hour so Abe’s candy bar hat will stay on as you serve the cookies.

About Presidents’ Day

This year, Presidents Day falls on Monday, February 20, 2017. February 22 was George Washington’s birthday, and Presidents Day began as a day to honor our very first president. For what presidential actions were Abraham Lincoln and George Washington most well-known? Who is your favorite president, and why? Can you name the Presidents in order? Here is a list of the US Presidents, from the founding of this nation to the current day.

  1. George Washington, 1789-1797
  2. John Adams, 1797-1801
  3. Thomas Jefferson, 1801-1809
  4. James Madison, 1809-1817
  5. James Monroe, 1817-1825
  6. John Quincy Adams, 1825-1829
  7. Andrew Jackson, 1829-1837
  8. Martin Van Buren, 1837-1841
  9. William Henry Harrison, 1841
  10. John Tyler, 1841-1845
  11. James Knox Polk, 1845-1849
  12. Zachary Taylor, 1849-1850
  13. Millard Fillmore, 1850-1853
  14. Franklin Pierce, 1853-1857
  15. James Buchanan, 1857-1861
  16. Abraham Lincoln, 1861-1865
  17. Andrew Johnson, 1865-1869
  18. Ulysses S. Grant, 1869-1877
  19. Rutherford Birchard Hayes, 1877-1881
  20. James Abram Garfield, 1881
  21. Chester Alan Arthur, 1881-1885
  22. Grover Cleveland, 1885-1889
  23. Benjamin Harrison, 1889-1893
  24. Grover Cleveland, 1893-1897
  25. William McKinley, 1897-1901
  26. Theodore Roosevelt, 1901-1909
  27. William Howard Taft, 1909-1913
  28. Woodrow Wilson, 1913-1921
  29. Warren Gamaliel Harding, 1921-1923
  30. Calvin Coolidge, 1923-1929
  31. Herbert Clark Hoover, 1929-1933
  32. Franklin Delano Roosevelt, 1933-1945
  33. Harry S. Truman, 1945-1953
  34. Dwight David Eisenhower, 1953-1961
  35. John Fitzgerald Kennedy, 1961-1963
  36. Lyndon Baines Johnson, 1963-1969
  37. Richard Milhous Nixon, 1969-1974
  38. Gerald Rudolph Ford, 1974-1977
  39. James Earl Carter, Jr., 1977-1981
  40. Ronald Wilson Reagan, 1981-1989
  41. George Herbert Walker Bush, 1989-1993
  42. William Jefferson Clinton, 1993-2001
  43. George Walker Bush, 2001-2009
  44. Barack Hussein Obama, 2009-2016
  45. Donald John Trump, 2016 (current)

Happy Presidents’ Day!


Create and teach your own Great Ideas as a Certified YogaKids Teacher!